
About time for an update/ change again I think!Dukasaur wrote:Yes, current list of token-dropping maps is here:Kid Moe wrote:Is there a list of maps anywhere that I can look at to accumulate some tokens, or if anybody has another way to accumulate them I am all ears
Subject: The Great War
Tokens
World 2.1
Classic Cities: London
Germany
World War I Gallipoli
Battle for Iraq!
Italy
Rail Europe
Poison Rome
Land and Sea
4 Star Meats
Like stars, the probability of dropping a token is proportional to the size of the game. Win a 12-player game on one of those maps, a token is almost certain. 1v1 games don't drop much.
The Great War
Forum rules
Please read the Community Guidelines before posting.
Please read the Community Guidelines before posting.
Re: The Great War


Re: The Great War
Yeah, it's more than about time. Amazing just how long my list of undone tasks really is. But this is getting close to the top now.thelord wrote:About time for an update/ change again I think!Dukasaur wrote:Yes, current list of token-dropping maps is here:Kid Moe wrote:Is there a list of maps anywhere that I can look at to accumulate some tokens, or if anybody has another way to accumulate them I am all ears
Subject: The Great War
Tokens
World 2.1
Classic Cities: London
Germany
World War I Gallipoli
Battle for Iraq!
Italy
Rail Europe
Poison Rome
Land and Sea
4 Star Meats
Like stars, the probability of dropping a token is proportional to the size of the game. Win a 12-player game on one of those maps, a token is almost certain. 1v1 games don't drop much.
“Life is a shipwreck, but we must not forget to sing in the lifeboats.”
― Voltaire
― Voltaire
Re: The Great War
It's okay to have multiple large posts. Just use "spoiler" tags to make them smaller so it doesn't take forever to scroll past for someone who's looking for something else...gigi_b wrote:Updated with pictures.
I guess it's worth it if you can insert the update into your message, Dukasaur. Not to have 2 copies of the same large post..
Spoiler
Dukasaur wrote:gigi_b wrote:Just finished. Again some chapters have map suggestions and some don't.
=================
1. Premises. Breakthrough as a state and the German Ruler
At the end of the XIX-th century, The Kingdom of Romania was a very young state, whose late self determination was mostly due to its geographical, or geopolitical position at the crossroads of Empires and their struggle for dominance in the area. The two old principalities of Moldova and Vallachia formed a personal union in 1859 with the election of the same ruling Romanian prince - Alexandru Ioan Cuza, which failed to be recognized by the rest of the European powers of the time and remained under Ottoman and Russian control.
In order to secure international recognition, the romanian political establishment sought for a foreign prince from Europe's great ruling families and found Karl of Hohenzollern-Sigmaringen, related to the Prussian dynastic family.
Karl quickly and diligently began carrying his duties as a ruler. He took the Romanian name of Carol and pledge himself and his dynastic family to Romania's religion, law and interests. Under his reign, Romania adopted its first Constitution, fought along side Russia in the Russian-Turkish war and gained independence from Ottoman rule, began structural modernization with rail-road infrastructure, city architecture and military structuring, his reign being shadowed by incomplete social reforms which kept the feudal-like status-quo and prompted several bloody peasant uprisings.
However he didn't forget his German origins and secretly signed an alliance Treaty with Germany and Austro-Hungaria in 1883, tying Romania to the Triple Alliance.[tr][td]
[/td]
[td][/td][/tr]
[tr][td]King Carol I[/td]
[td]The Romanian Ateneu - The landmark cultural/concert building raised during Carol's reign (1888)[/td][/tr][/table]
Maps:
- orient express, fog, trench, nuclear, X rounds -> romanian (hard) modernization (railway)
- unification germany, no fog, flat, chained - > german Prince of Hohnzollern-Sigmaringen
- WW1 ottoman Empire, escalating, fog, chained -> russian-ottoman war,
- American Civil War, no spoils, flog, chained -> social turmoil and conservative rule
- Three kingdoms of china, no spoils, fog, chained -> secret Treaty with the Triple Alliance
2. Romania's choices. Between kin and country.
Romania's elite and, in various measures, the political establishment, were greatly influenced by the French culture and politics of the age. Further more, in the wake of the earlier unification, the general national aspiration was towards also uniting with the other large Romanian provinces: Transylvania, Banat and Bukovina (all part of the Austro-Hungarian Empire) and Bessarabia (under Russian control). This made that the general Romanian public at the start of the Great War was decisively set towards the Entente, even if that made the Bessarabia issue (as it was part of Russia which was a member of the Entente) unsolvable.
Carol's wish, sealed by the secret Treaty, of steering Romania towards the Triple Alliance at the beginning of the war in 1914, came into clash with the political establishment. The final argument was that the Treaty stipulated a Romanian intervention only in the case of aggression towards the signing nations. And, as Austro-Hungary started the war against Serbia, Romania was not bound by it so it declared its neutrality. This weighted heavily on the old king's health as his family ties with his cousin, the German Emperor Wilhelm II and Germany in general were great.
Carol died shortly after the neutrality vote, leaving the throne to his nephew, Prince Ferdinand who, although part of the same German family was more willing to listen to public opinion. Further more, his wife, Marie of Edinburgh, the granddaughter of Queen Victoria of UK was pivotal in convincing her husband in joining Entente's side, and as it turns out played an important role of support throughout the Romanian Campaign and after the end of the war.
Map of Romanian provinces (still accurate, even if from different period)
- Wallachia(with Muntenia + Oltenia) in The South with red, Dobruja in brown and Moldova in (dark)blue make up The Kingdom of Romania pre WWI
- to the East, Bessarabia in light-blue was under Russian control
- Bukovina in light blue to the North, Transylvania and Banat (in green) were under AUstro-Hungarian Empire and the focus of the 1916 Romanian campaign
[tr][td]
[/td]
[td][/td][/tr][/table]
Marie of Edinburgh (at 18) and Prince Ferdinand of Romania (at 28) in 1893, the year of their marriage
Maps:
- Austro-Hungary -> the purpose of the war was getting Transilvania as part of the kingdom Kingdom
- Egypt: Valley Of The Kings -> "secret" relationships between kings/pharaos
- family feud ->
- Battle Of Actium -> just like Cleopatra, Marie convinced her husband to fight against his own nation/family
3. Romania joins Entente
After some political exploration of both sides, while using the neutrality status, Romania finally decided to get involved in the War. On 4/17th of August 1916 with the Treaty of Bucharest, Romania signed an alliance with the Entente Powers under some political and military agreements. Those involved granting the right to annex the sought for territories from Austro-Hungary: Transylvania, Crișana, Maramureș, Banat and Bukovina. The military agreement specified that the powers would supply military equipment, but also Russian support in Dobruja area to defend the Bulgarian front and the commitment to start two separate offensive in support of the new Romanian attack. While Romania was to attack Austro-Hungary from the south, Russia was to start a northern offensive (in the ongoing Brusilov Offensive) and France and Great Britain were to open an offensive in Greece (Thesalonik) to force Bulgaria out of the war and to secure the southern border of Romania from an attack there.
The need for supplies and relief offensives by Russia to the North and the allies in Greece was particularly important, as Romania was rather unprepared and poorly armed for the standards of 1916, thus "Romania facing a war on two fronts would be a liability, not an asset, to the Allies" (Wikipedia)
The Romanians from the provinces under Austro-Hungarian control entered the war in the Imperial army from the very beginning. But as Romania joined the conflict, many decided that "it was much better to risk their lives through desertion, rather than shoot their ethnical conationals"(Wikipedia).
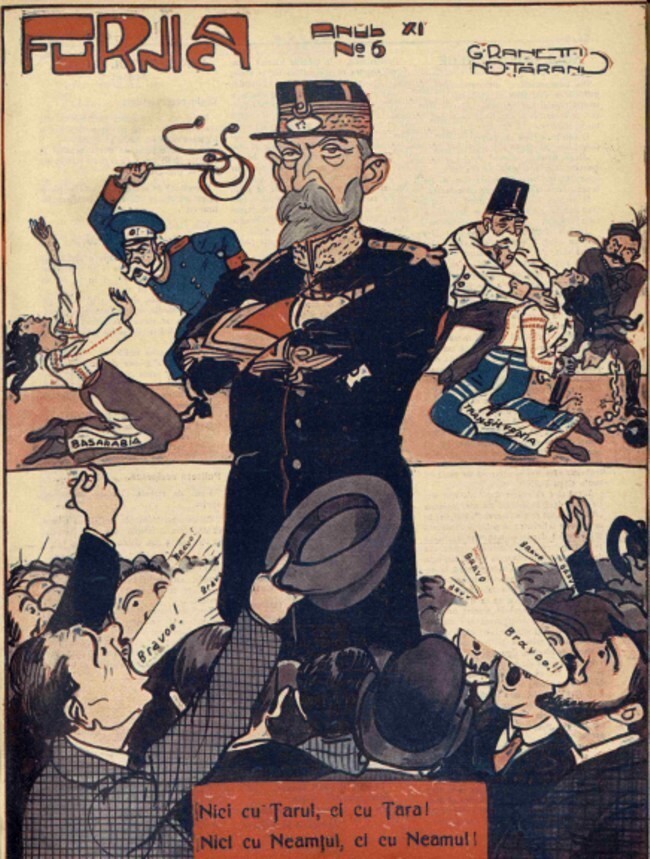
Cartoon from a local newspaper depicting the support King Ferdinand (in the center) got after delivering the declaration of war. The top part depicts 2 young girls wearing romanian traditional outfits, Bessarabia and Transilvania, being molested by russian officer on the left and austrian and hungarian on the right. The bottom message is a play of words which would (roughly) read: "Not with the Tzar, but with the Country!/ Not with the German but with our Kind!"
Maps:
- Chinese Checkers -> for the multiple military maneuvers stated in the treaty that ought to have lead to the best outcome for Romania's joining the war
- Arms Race -> depicting the need for supplies
- Austro-Hungarian Empire -> again the provinces granted by the Treaty to go under Romanian control
- Salem's Switch -> executions by hanging for romanian deserters from the Autro-Hungarian army
4. The enthusiastic initiative against an under-strength opponent. First phase for the Battle of Transylvania
Romania entered the conflict as soon as the official declaration of war was delivered to Austo-Hungary on the 27th of August 1916.
What ensued for the next couple of months came to be called the Battle for Transylvania(27 Aug-25 Oct 1916). It began as an enthusiastic offensive across the Eastern and Southern Carpathians, with the Second Army as the main group and the First and Fourth on its flanks, with the general aim of controlling the Mureș river. The plan was that the natural border of the river would both become a good defensive position in case of a counter-offensive and will also contract the front line by roughly 500 km, turning the front line from an (inverse) "L" shape (which was very long, thus hard to operate on) into a roughly straight (diagonal) one.
The first half of the month was greatly successful and was met with joy by the local press and public. However what was failed to be mentioned was the fact that the defenders, caught unprepared with focuses on the western front, were comprised of just the first Austro-Hungarian Army, a week force by comparison that was easily pushed back.
During the first part of the offensive, until the 13th of September, the three armies managed to advance roughly 100 km into Transylvania and capture key areas and towns like, Brașov, Orșova or Miercura Ciuc and pushing the front up to the Olt and Mureș rivers.
In the first two weeks of the campaign the Romanian troops met week resistance based on the unable and surprised autro-hungarian 1st army. It was initially formed of 30 batallions of infantry and landstrum (a militia-like group, made up of recruits), with 8 cavalry squadrons and 8 artillery batteries: a meager force. However during the 2 first weeks of the offensive, the Central Powers were able to bring from other fronts up to 11 infantry and 3 cavalry divisions matching the number of the Romanian force.
Geographical map of Romania with the outline of the front line at the height of the push at the end of August 1916. The locations are in german; Kronstadt=Brașov, Hermanstadt(just on the line)=Sibiu. You can also see the Mureș river which would have been the desired goal of the advance.
Maps:
- mountain areas -> ?
- river valley -> ?
5. The reality of war: the disaster at the Battle of Turtucaia/Tutrakan
Between the 1st and 6th of September 1916 took place the Battle of Turtucaia in the southern Romanian front. It came to be the most bitter Romanian military defeat in history. At the end of the 6 days of fighting, from about 39 000 Romanian troops present during the action, 28 500 were taken prisoners, about 7000 were dead or wounded and only around 3500 were able to escape. On the Central Powers side, the Bulgarians suffered most of the casualties; from an estimate of 9000 killed, wounded or missing, only around 40 were German.
Turtucaia represented a fortified stronghold on the right bank of the Danube which was gained along with the 2 Bulgarian provinces after the Second Balkan War of 1913. Dubbed as "the Romanian Verdun" it had the same characteristics as a fortified redoubt of the time. With the centre around the village of Turtucaia it had 2 concentrical lines of defence anchored by the natural barrier of the Danube. The first one at roughly 3-4 km away from Turtucaia was made up of trenches and ditches with firing nests, with much of the structure unfinished or deteriorated. To the front, the primary line of defence was at around 8-10 km radius from Turtucaia and had 15 centres of resistance which were bunker-like shelters that could hold up to 70 men, with a raise of 60 cm above the ground and reinforced rooftops. They were connected with a web of trenches with barbed wire and machine gun positions.
Much of the artillery was concentrated around Turtucaia with some mounted on the river monitors that were to support the defence. Unfortunately much of these were obsolete based on modern standards with low firing speed and functioning only from fixed positions.
"For command purposes the entire area of the fortress was divided into three sectors: I (west), II (south) and III (east), also named after local villages - Staro Selo, Daidur, and Antimovo. Each of them had its own commander"[16] of different groups of the 17th infantry division, of the Romanian 3rd army.
The opposing force was the bulgarian-turkish-german army assembled under field marshal Mackensen with the purpose of striking a rapid blow to the Russian-Romanian force around Danube and Black Sea coast, in order to to give the in-process build-up of forces on the Carpathian front under Falkenhein sufficient time to prepare for a counter-offensive. The initial plan of Mackensen was a parallel assault on both Turtucaia and Silistra along the front line, but it was opposed by the Bulgarian Gral Stefan Toshev who presented a plan that focused on Turtucaia. As this relied on better intelligence of the front, the Bulgarian Gral's plan was approved by Mackensen with minor modifications.
The operation began on September the 1st with the Bulgarian-German troops passing the border and pushing back the guard patrols. The next 3 days, following the plan, the Central Power's troops maneuver to encircle the Turtucaia stronghold, at first attacking on the entire front and then moving its left and right flank up towards the Danube with reinforcements on the right in order to suppress an eventual relief operations from the Silistra direction. In fact on the 3rd of September the head of the 3rd Romanian army and the front sends orders to 2 Russian divisions at Silistra to support the defence, but the order is received late and not executed. On the 4th the Bulgarian-German army attacks the western sector I as a decoy to allow the main build-up of troops in Sector II which was were the main offence was planned. The commandment at Turtucaia starts to receive seom reinforcements from the other side of the Danube. On the 5th the main push is ordered against the southern centres of resistance of the main defence line with attacks against posts 4 up to 9. These are all successful and the Romanian troops withdraw to the secondary positions, In sector III in the east, even though the enemy conquers only the 11'th centre of resistance, there is a general retreat towards the secondary defences. On the 6th of September, the Romanians try 2 counter-attacks. One in sector I with the aim to recover centres 2-4 and the forest in the area and another one in Sector III, supported by the river monitors and some of the troops arrived from Silistra. Both of them fail, with the one in Sector III briefly managing to secure a connection for some of the troops to retreat. The command of the stronghold fleas the area before the enemy arrives in Turtucaia and the colonel left in command offers unconditional surrender soon after.
After the battle, gen Toshev remarked that "even women could have held the attack for 4-5 days" at Turtucaia, marking the swift and hard blow inflicted by him and his men to the Romanian army. It was indeed a grave defeat for the Romanian side, a result not only because of poor equipment and local defence outline, but mostly due to inapt command of the field officers that failed to finish defence preparations and failed to follow battle orders in some cases. The use of reserves was badly managed; they were committed to battle without a build-up that would make their action sustainable, but as they arrived. Big army groups retreated without exchanging fire with the enemy or entering skirmishes. The commander of the initial 17th division that was the main group of defence, actually fled the field before the battle was done, leaving behind his troops and to an inferior officer the task of surrendering.
"The scale of the defeat forced Romania to detach several divisions from its armies in Transylvania, greatly reducing the impetus of the advance there. On 7 September that advance was restricted by the Romanian high command, and on 15 September it was halted altogether, even before the armies had linked up on a defensible front. Major changes were made in the command structure of the forces operating against the Bulgarian Third Army. Command of the Romanian Third Army was taken over by General Averescu, and the Russo-Romanian forces in Dobrudja were reorganized as the Army of Dobrudja under General Zayonchkovski."[16]
Schematic depiction of the state of the fort and troop manuevers during the engagement.
The general location of the operations can be seen on the map from the previous section. Both Turtucaia (Turtukai) and Silistra (Silistria) are just below the Danube.
Maps:
- Siege -> Turtucaia
- stronghold fort -> Ziggurat
- swift and decisive victory -> Conquer 500
6. Start of Central Powers counter-offensive. Second phase of the Battle for Transylvania
After halting the advance with the reinforced 1st Austro-Hungarian army and the newly formed German 9th army under former German Chief of Staff, Erich von Falkenhayn, the Central Powers prepared for a counter-offensive. By the 18th of September the Romanian troop superiority was matched and the offence halted. This was also due to troop maneuvers of the Romanian army intended at filling the gap left in the South with the defeat and loss of Turtucaia.
At first the plan was for a double push, with the northern 1st Austro-Hungarian army in the direction of Trotuș-Oituz with the goal of reaching Siret valley to disable Russian reinforcement of the area. The second counter-offensive, held by the German 9th army with the objective of cutting through the most accessible defence line of the Southern Carpatians with the goal of reaching the capital, Bucharest.
Isolated the groups of the 3 Romanian armies which entered Transylvania seemed as the best plan for the counter-offensive. Falkenhein decided to focus on one them and try to disable it. The best suited for this tactic was the group on the valley of river Olt which was located around the town of Sibiu and was the most isolated one with a large mountain area that blocked connection with the western Jiu group.
Falkenhein suspended the fights with the Jiu group which had already been pushed back to the original position of the border. He ordered all the filed commanders to suspend operations, dig for defence and send all available army groups towards a build-up in the Sibiu area.
Maps:
-
7. Second phase of the Battle for Transylvania: Battle of Sibiu, Battle of Olt and Mureș
The Battle of Sibiu, which happened between the 26th and 28th of September 1916, was part of the Romanian operation to conquer Transylvania. From the Romanian perspective, the purpose would have been to stop the offensive of the Central Powers following the stop of the Romanian advancement and the build-up of troops, consolidating a defensive line on the Carpathian Mountains and thus enabling the forces to regain the initiative and regain the offensive.
On the other side Falkenhein and the Commandment of the Central Powers' forces saw it as a strategic breaking point for the planned counter-offensive. Its objective was opening the Carpathian Mountains while engaging each army group at the time with focusing superior strenght and also opening a way towards the Romanian capital of Bucharest. This led to the presence of 4 infantry and 2 cavalry divisions put at the disposal for the offensive, including mountain specific equippement - more importantly -artillery. The Romanian forces had 2 infantry divisions and 1 cavalry brigade, with no mountain artillery nor experience for mountain fighting.
The opening maneuver was entrusted to the seasoned Alpine Core, a battled experience elite group which had already seen fighting on the Italian front. Its orders was to envelop the Romanian forces and after a 4 day action, it successfully passed the Cibinului mountains.
The encircled Romanian Olt group fought to keep positions and then tried for a southern retreat. The help from the northern 2nd army couldn't help the defeat. This relief action was mounted too late and let to the confrontations from the Battle of Olt and Mureș (being the 2 rivers that were part of the front line). Between the 28th of September and 4th of October fighting took place in the area enabling the relief for the retreating Olt group and also trying to push against the flank of the German offensive.
The retreat was made with haste with the enemy keeping pressure at the back. This lead to often bayonet engagements in order to secure a line of withdrawal.
As with the Battle of Turtucaia, this first engagement of the Romanian army, this time on its western front of operation, would bare the mark of lack of preparation and grave incompetence from the leaders in charge, which put troops from the very start into a desperate tactical situation.
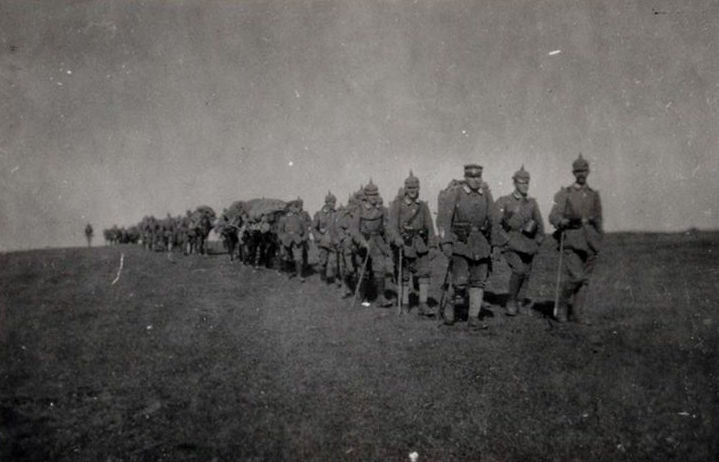
Alpine Corps on march over the Carpathians
German artillery battery. High quality military equipment and experienced artillery men were key factors for German success on the Romanian front.
Maps:
-
8. The maneuver at Flămânda. Second phase of the Battle for Transylvania: Battle of Brașov
In the aftermath of the Turtucaia defeat the Romanian High Command saw that it needed to react to the surprise and rapid push from the South coming from group Mackensen. Seeing the danger of encirclement, it was decided to reinforce the 3rd Romanian Army, led by Gral Alexandru Averescu, and to also commit the remaining Dobruja army from the south for an operation of encirclement of the German-Bulgarian army.
The maneuver would mean that the main army group would try to cross the Danube at Flămânda and try to cut the Mackensen army from behind, while a secondary attack would try to pin the front around Cobadin and Kurtbunar.
The offensive started on the 29th of September with the advancement on a 80km wide front with superior Romanian forces against Mackensen's left flank. On the 1st of October 2 Romanian divisions crossed the Danube at Flămânda and created a bridgehead with an actual pontoon bridge being built. On the 2nd and 3rd October the offensive was counter-attacked by the Austro-Hungarian Danube flotilla, as it tried to halt the crossing and even destroy the bridge, but this was mostly repelled by the Romanian coastal artillery in place.
However, due to the deteriorating situation in the Transylvaniana front, on the 4th of October, Gral Averescu decided to halt the offensive and to retreat all the troops on the Northern bank of the Danube.
The actual situation in Transylvania was mostly deteriorating after the defeat and following retreat from the Battle of Olt-Mureș and the beginning of the German offensive in the Carpathians.
After disabling the Olt group, Falkenhein concentrated the efforts against the 2nd Romanian army on its left flank which was operating in the outskirts of Sibiu. Between the 4th and 7th of October the German 9th army constantly pushed against the Romanian 2nd making use of superior and more experienced artillery and organization. On the 7th of October the advance reached the outskirts of Brasov where the Romanian army decided to make a stand in what came to be the Battle of Brasov.
The first day, the 7th of October, saw heavy fighting around the outskirts of Brasov in the towns of Codlea and Râșnov where the German-Autro-Hungarian troops managed to make some progress, but the assaults against Brașov failed. Further North around the heights of Hătman and Sâmpietru a succession of attacks and counter-attacks led to build-up of troops on both sides. On the second day, the battle extended to the western and southern fronts around the city of Brașov, where the Germans managed to occupy Zărnești, forcing a Romanian retreat. On the northern sector the Romanian troops managed to repel the attacks which would have led to encirclement, but the counter-attacks failed as well due to well executed german artillery barrages.
The large number of victims and the destruction of much of the Romanian artillery led to the general retreat of the 2nd army further South. The battle of Brașov was lost.
After 40 days the offensive campaign of the Romanian Army in Transylvania ended with a general retreat with the purpuse of stabilizing the front on the initial border between Romania and Austro-Hungary.
Pontoon bridge over the Danube
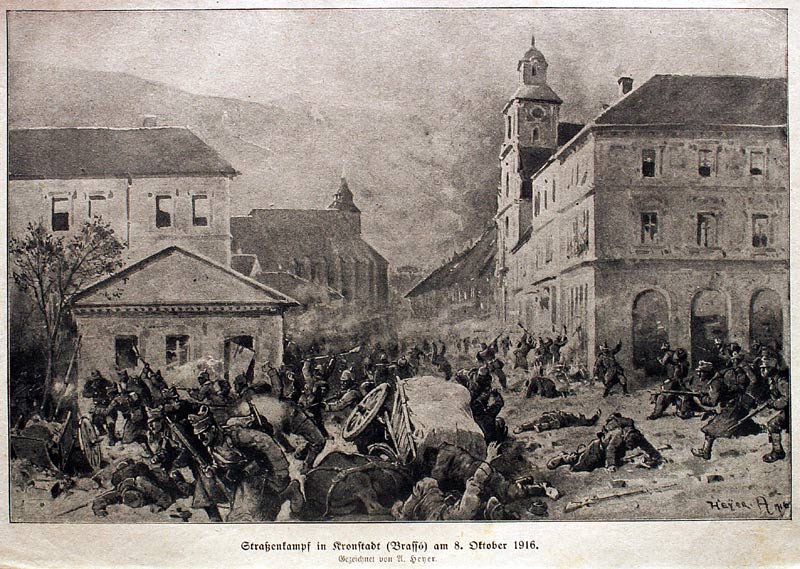
Scene of battle in Brașov on the 8th of October 1916
Maps:
- river battle -> ?
- artillery precision -> >
9. Fighting for survival: Battle of Bucharest
At the end of November 1916 the Romanian Army was in a disordered and confused defensive, being simultaneously pushed from the North, West and South by the german, austro-hungarian, bulgarian and turkish armies. Between the 30th of November and the 6th of December Romania tried a final offensive which would later be consider useless, at most serving as a delay to be used by the population and Government to retreat to Moldova.
Theoretically the offensive would have been possible, but in reality the Romanian Army was clearly outnumbered, with inferior military technology and low morale after the series of defeats suffered. Moreover the current front was pushed beyond the strategically important positions: Carpathians to the North, the valley of the Olt river to the West and the Danube to the South. The current positions in the Southern Romanian Plain were far more difficult to attack or defend.
The Romanian 1st Army operating in the South and South-West tried an offensive operation against the junction of the Falkenhein and Mackensen groups, but it was easily pushed back. On the 1st of December the Mackensen group counter-attacked on the entire southern front line pushing back the Romanian troops. The defence was even more hindered by contradictory orders and, most of all, culminating with the capture of documents containing orders for the general operation of the Romanian Army with detailed strategy and troop positions.
This meant that starting from the 2nd of December, the Central Powers troops were able to hit accordingly and managed to destabilize the Romanian troops.
On the 5th of December the Romanian High Commandment ordered the retreat to the East with the destruction of transportation facilities, railway, bridges as well as oil production facilities. The withdrawal was greatly hampered by the state of the roads and weather conditions and was made hastily and sometimes in panic with leaving equipment and supplies behind. Some orders of retreat were received too late; the 4th division received the retreat order after 21 hours which led to its complete encirclement and capture of more than 11 000 men with all equipment.
On the 6th of December Bucharest was occupied by field marshal Mackensen's troops.
Following the fighting the 1st Army was almost shattered and the 2nd lost two division, the result of the battle being disastrous. With the great loss of both men and military equipment, the Eastern Front fell entirely to Russian effort who had to secure their southern flank by relocating troops from other areas.
For some 2 thirds of the Romanian Kingdom began the foreign occupation, while for the retreating troops and refugees in Moldova it meant misery by overcrowding, disease and loss of hope.
[tr][td]
[/td]
[td][/td][/tr]
[tr][td]Postcad with Mackensen and Falkenhein, "The Conquerors of Romania" after the fall of Bucharest[/td][td]Oil field set on fire[/td][/tr][/table]
Maps:
-
10. Heroes for a Cause.
At the start of Romania's campaign, Constantin Mușat was mobilized as a soldier in the 2nd Regiment of border guards around the Predeal area. He was thus one of the first soldiers to begin the Transylvanian campaign of 1916. In late December 1916, during a counter-attack he was wounded in his left forearm which had to be amputated. Even though he had suffered debilitating wounds, he refused to be discharged. For his attitude he was granted the rank of corporal and was cited for his bravery in the daily order by King Ferdinand on the 17th of February 1917. Between April and july of 1917 he retrained with his unit, specializing at throwing hand grenades with his able right hand. Him and his unit were committed to the engagements in the Second Battle of Oituz in august 1917, where, during the fights around Cașin on the 13th he lost his life. For his courage and sacrifice he was posthumously awarded the rank of sergeant.
In late November 1916 the entire Romanian forces were in full retreat, trying to withstand the pressure from both the eastern offensive of group Falkeinhein and the southern one from group Mackensen. The 18th division of the Romanian 4th army was trying to secure the retreat along the Zimnicea-Bucharest line, facing the Kosch group of 4 divisions. On the 27th of November an Alpenkorps battalion successfully makes a pincer move by capturing the Prunaru village and thus cutting the retreat line and threathening the complete encirclement of the romanian division. Sensing the imminent danger, the division commander, Gral Refendaru, orders 4 successive attacks against the strengthened positions of Prunaru on the 27th and 28th. They all fail with large number of casualties. As a desperate last resort he is forced to order the 2nd Cavalry regiment a charge against the enemy positions. The 300 men from the Regiment, under the command of colonel Gheorghe Naumescu, are divided into 3 squadrons and take positions 3 km away from the village, shielded by a hill and foggy conditions. The first 2 squadrons, under cpt Marin Vasilescu and lieutenant Ion Dănescu, are ordered to charge as lancers at the enemy positions around the village, while the 3rd, under lieutenant Alexandru Budac is to continue towards the village. The outskirts positions around the village are breached by the surprise and rapid attack, but the attack on the village itself turns into a slaughter.
The defence of the village of the german Alpenkor is made up of tens of machine-gun nests which decimates the charging cavalry. The 3rd squadron is joined by the remainder of the other two and fierce fighting ensues with men using the dead body of horses as shields and ending up at bayonnet assaults. However the powerful assault meets its goals as german batallion retreats, thus lifting the encirclement of the romanian division.
The 2nd cavalry regiment lost 216 men, but its heroic assault allowed the division to hold the line of retreat and participate in the defence of Bucharest.
Ecaterina Teodoroiu was born in a modest family near Târgu Jiu. After Romania entered the war, she initially worked as a nurse, while her brother joined the army. "Working as a nurse, on October 14 Ecaterina joined the civilians and the reserve soldiers fighting to repulse the attack of a Bavarian company of the 9th German Army at the bridge over the Jiu River, in front of Târgu-Jiu. Impressed by her bravery, the Royal Family invited Ecaterina to Bucharest on October 23"[14] of 1916. On November the 1st her last of the 4 brothers was killed during a fight, which made Ecaterina to apply as a volunteer soldier in the same 18th Infantry Regiment as her brother. She is sent to the front rather reluctantly, but she soon proves her military skills by avoiding the capture of her company and, later, escaping after being captured by shooting her guard with a concealed revolver. In the first part of November 1916 she is severely wounded in both legs, evacuated and hospitalized.
In January 1917, after being released from hospital she requests to join the 43/59th infantry Regiment as a nurse. For her bravery she "is awarded the 'Military Virtue Medal', 1st Class, made honorary Second Lieutenant by King Ferdinand and given the command of a 25-man platoon in the 43/59 Infantry Regiment"[14]. The regiment is assigned to the reserve of the Romanian 1st army and on the very last day of the Battle of Mărășești, on the 3rd of September, while leading a counter-attack on the Secuiului Hill, she is killed by machine-gun fire.
She is remembered for her commitment and bravery and for being the first female officer in the Romanian Army who sacrificed her life at barely 23 years of age.
Lieutenant Grigore Ignat entered the war at the command of a machine-gun company of 200 people from the 51st infantry Regiment. He was part of the Cobadin battle in Dobruja and later in the 1916 campaign he participated in the fights and retreat from Oltenia where he showed courage and gained the rank of captain. He would get his renown and be remembered for ultimate bravery during the battle of Mărășești in 1917. The 19th of August saw the peak of the engagements. One of those, near the Răzoare forest, was Hill 100, a strategically important position both as high ground and as being the shield for a great russian-romanian artillery position which delivered powerful blows. The 1st machine-gun company under cpt. Grigore Ignat was ordered to keep the position on the hill and wait for reinforcement. It stubbornly kept its ground being almost entirely destroyed. Its commander was posthumously raised to the rank of major and awarded the Mihai Viteazul Order 3rd class.
On the 12th of August the Autro-Hungarian army had made significant gains in the Oituz area and was threatening to break to the rear of the russo-romanian armies. Reserve forces had to be committed, some had to do forced marches in order to arrive at the scene. The Mountain Battalion of the 15th Regiment, commanded by maj. Virgil Bădulescu, made a 160 km march and, after just a 20-minute pause, was ordered to attack unshielded by artillery. It managed to broke through the defence of the Austro-Hungarian 70th Division and infiltrated behind enemy lines. It captured 417 prisoners and 4 machine-guns, while suffering minimal casualties: 2 dead and 19 wounded. It was a decisive action that lead to the capturing of the Cireșoaia Peak and great loss for the opponent. "For this action, the commander and seven of the battalion's officers received the Mihai Viteazul Order 3rd class, approximately a third of the 25 awarded for the actions during the battle of Oituz."
Maps:
- infiltrating and attack from the rear: WWII Gazala
- cavalry charge: Austerlitz, Waterloo
- holding the hill: Rorke's Drift
- grenade throwing: ?
- female warriors: ?


“Life is a shipwreck, but we must not forget to sing in the lifeboats.”
― Voltaire
― Voltaire
-
jayvee1000
- Posts: 36
- Joined: Sun Jan 08, 2017 9:10 am
Re: The Great War
The latest round - Flers-courcelette - requires 25 Drab tokens which is more than I have. Any chance of a reduction of this requirement ?
Re: The Great War
No, but I sent you 8 credits so you can buy a box of 20 drabs in the Store. I figure you probably have 5 already.jayvee1000 wrote:The latest round - Flers-courcelette - requires 25 Drab tokens which is more than I have. Any chance of a reduction of this requirement ?
Thanks for being interested in this series!
“Life is a shipwreck, but we must not forget to sing in the lifeboats.”
― Voltaire
― Voltaire
-
jayvee1000
- Posts: 36
- Joined: Sun Jan 08, 2017 9:10 am
Re: The Great War
Thanks Dukasaur - have used the credits and entered the round. Great series

Re: The Great War
I must say that I also enjoy Great War although I started to play the tournament this month only. Plenty of well thought and various settings for great fun 


Re: The Great War
Updated list
Bazentin Ridge, July 14th, 1916 - posted by both ConfederateSS and morleyjoe
Delville Wood, July 15th, 1916 -posted by ConfederateSS
Battle of Pozières, July 23rd, 1916 -posted by ConfederateSS
Romani, August 3rd, 1916 - posted by ConfederateSS - COMING SOON
Sixth Battle of the Isonzo, August 6th, 1916 -posted by ConfederateSS
Gorizia, August 6th, 1916 - posted by ConfederateSS
Battle of Guillemont, Sept 3rd - posted - morleyjoe
Seventh Battle of the Isonzo, Sept 14th - posted - morleyjoe
Battle of Flers-Courcelette, Sept 15th, 1916 - posted by morleyjoe
Eighth Isonzo, October 8th, 1916 - posted by morleyjoe - COMING SOON
Ninth Isonzo, November 1st, 1916 - posted by morleyjoe
These are currently open for drafts:
Maghdaba, December 14th, 1916
Second Kut, Dec. 15th, 1916
Opening 1917, the small but exciting Battle of Khadairi Bend, January 9th, 1917
Battle of Nahr-al-Kalek, February 26th, 1917
Fall of Baghdad, March 11th, 1917
Samarrah, March 13th, 1917
Fallujah, March 19th, 1917
Jebel Hamrin, March 25th, 1917
First Gaza, March 26th, 1917
Last edited by morleyjoe on Mon Oct 23, 2017 2:23 pm, edited 1 time in total.
-
davidadam2017
- Posts: 1
- Joined: Fri Oct 06, 2017 12:03 am
- Gender: Male
- Location: United Kingdom
Re: The Great War

Image above from Wikipedia.com
Ninth Battle of the Isonzo
November 1st, 1916 - Round nine: another Italian attack on the Isonzo
The Eighth Battle is barely over, but now the Italians are attacking again on the Isonzo. Cadorna hopes that now at last the Austro-Hungarians will break in the face of the Italian onslaught. He is determined that there will be no backsliding on the part of his men. The local Italian commander has already had men summarily executed for mutiny. Now Cadorna goes one step further and orders that any unit that fails in its duty is to be decimated: one in ten men picked at random and shot. He also has military policemen with machine guns deployed behind the assault troops, ordered to fire on their own comrades if they move forward too slowly.
The Italians are attacking on the Carso plateau, scene of much of the Isonzo fighting. Italian artillery has done its job well this time, pulverising the Austro-Hungarian frontline positions. The Italians make astonishing gains, pushing three kilometres into the enemy positions along at five kilometre wide front. Now Cadorna pushes forward his reserves in the hope of exploiting these gains and achieving a general breakthrough. But the Austro-Hungarians too are sending forward their reserves, in a desperate attempt to prevent the collapse of their line.
November 2nd, 1916 - Ninth Isonzo: the Italian juggernaut appears unstoppable
Italy’s ninth offensive on the Isonzo continues. This time things are going well for the Italians. They have overrun the Austro-Hungarian first line along several kilometres of the front on the Carso plateau and are pushing forward towards the enemy’s second line. Boroevic tries to stop the Italian advance by launching a great counter-attack of his own. Savage fighting ensues, but Cadorna sends forward the Italian reserves. The Austro-Hungarians are overwhelmed and forced to fall back. The Italian advance continues.
To the Austro-Hungarians it looks now as though their second line is bound to fall. Is the Italian breakthrough imminent?
November 4rd, 1916 - Cadorna’s nerve fails again
Italian troops continue to push forward on the Carso plateau. An Austro-Hungarian counter-attack failed to stop their advance. Now the Italians are pushing towards the enemy’s second line of defence and few on the Austro-Hungarian side think that this will stop them. Boroevic, the Austro-Hungarian commander, is running out of reserves to commit to the battle. He has just one battalion left, an ethnically mixed unit from the Banat region. He sends them forward to launch one last desperate counter-attack against the Italians.
The Banat soldiers are heavily outnumbered, yet somehow their attack achieves the impossible. The Italians are shaken, their onward march temporarily halted. In the lull, another infantry division arrives from Galicia to reinforce the Austro-Hungarians. They wait for the Italians to resume their advance, hoping that they might just now be able to contain it.
But the Italians do not renew their advance. Cadorna too is shaken by today’s counter-attack. He orders a halt to the offensive. He hopes to launch a new offensive before Christmas, weather permitting, once his artillery has had a chance to batter the enemy’s second line trenches. For now the Italian troops are to be stood down.
The Austro-Hungarians are astonished. They know how desperately stretched their lines are now, how close they are to breaking. As with the Eighth Battle, Cadorna appears to have thrown away a chance for victory.
The Ninth Battle has cost the Italians another 39,000 casualties, while the Austro-Hungarians have suffered something like 33,000.
Above text is al quoted from Blog at WordPress.com - https://ww1live.wordpress.com/tag/ninth ... he-isonzo/
Round 1. The Italians are attacking again . 25 start, Random Draw, 6 games, 20 move on. Games: 5 players, Standard, Escalating, Fog/No fog, Chained. Maps - Italy, Supermax: Prison Riot!, Poison Rome
Round 2. Italian artillery has done its job well this time. 20 start, Random Draw, 3 games, 15 move on. Games: 5 players, Standard, Escalating/Flat Rate, Fog, Parachute. Maps - Rail Europe, Orient Express 1883, Duck And Cover
Round 3. The Austro-Hungarians are overwhelmed. 15 start, Random Draw, 6 games, 10 move on. Games: 5 players, Standard, Escalating, No Fog, Unlimited/Parachute. Maps - Napoleonic Europe, King Of The Mountains, Magyarország
Round 4. Banat soldiers are outnumbered yet achieve the impossible. . 10 start, Random Draw, 3 games, 5 move on. Games: 5 players, Standard, Escalating, Fog/No Fog, Trench/No Trench, Chained/Unlimited. Maps - Trench Warfare, Balkan Peninsula, Third Crusade
Round 5. The Austro-Hungarians are astonished. 5 start, Random Draw, 9 games, 5 move on. Games: 5 players, Standard, Escalating, Fog, Adjacent. Maps - Unification Germany, Unification Italy, Austro-Hungarian Empire
Last edited by morleyjoe on Tue Oct 31, 2017 1:32 pm, edited 1 time in total.
Re: The Great War
Twelfth Quarter Archive
back to main index
khanaqin
--------Tournament of The Battle of Khanaqin-------
----1/7...NO TRENCH..........16 Player Tournament---
--------------Wayward Day's Diary: June 4th,1916
-----My third travel in this Great War has brought me to the center of the Sun. Well the Middle East. It appears I am a German soldier who is traveling with the Turkish 6th army. Our commander is Lt.Col. Ali Ishan Bey. We have been sent to stop the Russians under the command of General Baratov. From taking the city of Khanaqin. It is the only massive battle fought between the Russian and Ottoman Empires on the Mesopotamian front. My guess there would have been more. But when the Bolsheviks took power in Russia. They took Russia out of The Great War.
-----Anyway the battle went totally in favor of the Turks. Ishan was able to stop Baratov's advance in the area. The Turks chased the Russians out of Mesopotamia. However, there is news of an Arab revolt. Have to see if it amounts to anything.
Round 1:(maps--because of Mesopotamia)
--The Russians attacked the town of Khanaqin head on. But the Turkish unit led by Sevket Bey held onto the death. The Russians fled.
16 start and 16 move on. Maps:Battle for Iraq,Ziggurat,4-4 player games,2 on Battle for Iraq,2 on Ziggurat,Standard,Auto,Sequential,Escalating,(Unlimited,Chained),30 rounds.
Round 2:(maps--Ishan-born in Istanbul,Genocide,looks Arabic)
--Ali Ishan Bey is widely known for his part in the Armenian Genocide. He was born in Constantinople before the Turks changed the name to Istanbul.
16 start and 8 move on. Maps:Classic Cities:Istanbul,Das Schloss,Thyseneal,2-8 players play,2 on C.C.:Istanbul,2 on Das Schloss,2 on Thyseneal,Terminator,Auto,Sequential,Escalating,(Unlimited,Chained),30 rounds.
Round 3:(map--because of Mesopotamia)
--The only massive clash between The Ottoman and Russian Empires in the Mesopotamian front.
8 start and 8 move on. Map:Gilgamesh,2-4 players play,7 games,Terminator,Auto,Sequential,Escalating,(Unlimited,Chained),30 rounds.
Round 4:(maps--because of The Ottoman Empire)
--Lands taken and owned and attacked by the West of The Ottoman Empire"the sick man of Europe".
8 start and 6 move on.Maps:WWII Ottaman Empire,Third Crusade,2-4 players play,2 on WWII Ottaman Empire,2 on Third Crusade,Assassin,Auto,Sequential,Escalating,(Unlimited,Chained),30 rounds.
Round 5:(map--Oasis--hot as the Sun)
--The horrible heat led to many desertions and death.
6 start and 4 move on.Map:Oasis,6 players play,3 games,Terminator,Auto,Sequential,(Nuclear,Zombie),Chained,Fog(sand storm),30 rounds.
Round 6:(map--Soviet Union--Russia/Bolsheviks)
--The Bolsheviks take control of Russia. They take Russia out of World War I.
4 start and 2 move on.Map:Soviet Union,4 players play,5 games,Assassin,Auto,Sequential,Escalating,(Unlimited,Chained),30 rounds.
Round 7:(map--because Arab Revolt--Middle East)
--After chasing away the Russians. The Turks had to deal with"The Great Arab Rising" or The Arab Revolt.
2 start ,Map:Middle East,1-vs-1,9 games,Standard,Auto,Sequential,Escalating,Chained,Fog(sand storm),30 rounds.
-- CSS
lutsk
The Battle of Lutsk
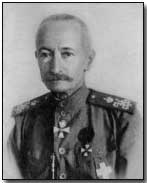
While the Battle of Lutsk was relatively short (June 4th to 6th, 1916), it was the opening attack of the Brusilov Offensive (pic of Alexei Brusilov) which became known as the Russian Empire's greatest feat during WWI. It was the worst loss for Austro-Hungarian forces.
On the night of June 4th, the Russians started with a barrage of artillery against the Austro-Hungarian Fourth Army. It was so intense that it broke more than 50 gaps in the barbed wire defenses.
Those defending Lutsk fled in panic or surrendered without resistance. Although they fought back briefly, the overwhelming Russian Infantry pressed forward.
In just two days, 130,000 Austro-Hungarian forces were lost. This forced Austria to halt it's attacks in Italy. It also brought Romania into the war. From this point onwards, the Brusilov Offensive would move ahead in force for the next 4 months.
Credit to the following for most of my info:
http://www.firstworldwar.com/battles/lutsk.htm
https://en.wikipedia.org/wiki/Battle_of_Lutsk
24 Players start
Round 1: Russian forces pounded gaps in the barbed wire. Random Draw, 5 games, 24 move on, Games: 6 Players, Terminator, Escalating, No Fog. Map - Trench Warfare
Round 2: The defenders fled in panic or surrendered without resistance. 24 start, Random Draw, 6 games, 16 move on, Games: 8 Players, Terminator, Escalating, Fog. Maps - Middle Ages, Classic Cities: Pot Mosbi
Round 3: With overwhelming numbers the Russians pressed the attack. 16 start, Random Draw, 9 games, 8 move on, Games: 4 Players, Terminator, Escalating, Fog. Maps Austro-Hungarian Empire, WWII Eastern Front, Soviet Union
Round 4: A change of direction for many nations. 8 start, Score Resets, Random draw, 8 games, 8 Players, Terminator, Escalating, Fog. Maps Germany, Italy, Orient Express 1883, Europe 1914
-- MJ
first day of the Somme
The First Day of the Battle of the Somme was some of the worst losses for the British Empire. There were several nations involved in the battle, including the Newfoundland Regiment, who were with the 88th Brigade of the 29th Division.
Of all the battles that the Newfoundland Regiment fought during the First World War, none was as devastating or as defining as the first day of the Battle of the Somme. The Regiment's tragic advance at Beaumont Hamel on the morning of July 1, 1916 became an enduring symbol of its valour and of its terrible wartime sacrifices. The events of that day were forever seared into the cultural memory of the Newfoundland and Labrador people.
The Newfoundland Regiment was stationed in trenches near the French village of Beaumont Hamel, which lay behind German lines. It was a strategically difficult position. The German front lines were about 300 to 500 metres away, down a grassy slope and heavily guarded by barbed wire entanglements. The German 119th Reserve Regiment, tough and experienced, had turned the natural defences of a deep Y-shaped ravine into one of the strongest positions on the entire Somme front. The Newfoundland Regiment's assignment (along with the rest of the 88th Brigade) was to seize control of the German trenches near the village of Beaumont Hamel. The Regiment would be part of a third wave of attackers to leave Allied trenches.
As the first wave of Allied troops left their trenches at 7:30, they were greeted by a devastating barrage of enemy artillery and machine gun fire. It was far stronger than anyone had anticipated. Most men were killed or wounded in minutes. A second wave of troops left their trenches soon after and met with the same fate. The Newfoundland Regiment was still in its trenches, awaiting orders to go over the top as part of a third wave of attack.
The men left their trenches at 9:15 a.m., with orders to seize the first and second lines of enemy trenches. But as they moved down the exposed slope towards No Man's Land, no friendly fire covered their advance. Instead, German cross-fire cut across the advancing columns of men, killing or wounding most of them before they even reached No Man's Land.
The attack was a devastating failure. In a single morning, almost 20,000 British troops died, and another 37,000 were wounded. The Newfoundland Regiment had been almost wiped out. When roll call was taken, only 68 men answered their names - 324 were killed, or missing and presumed dead, and 386 were wounded.

Above text and images are excerpts from Heritage Newfoundland & Labrador http://www.heritage.nf.ca/ website
Read all the details at http://www.heritage.nf.ca/first-world-w ... mel-en.php
Round 1. Germany had marched through Belgium and into northern France. 24 start, Random Draw, 6 games, 24 move on. Games: 8 players, Standard, Flat rate, random fog, adj forts. Maps - France, BeNeLux, Germany
Round 2. Newfoundland Regiment is with the 88th Brigade of the 29th Division. 24 start, Random Draw, 6 games, 18 move on. Games: 4 player, Terminator, No spoils, no fog, unlimited forts. Maps - Wales, Scotland, England
Round 3. Many soldiers sent letters home in the days before the battle. 18 start, random Draw, 6 games, 14 move on. Games: 9 player, Terminator, Esc, no fog, chained forts. Maps - Canada, North America, Golfe Du Saint-Laurent
Round 4. Allied trenches stretched along one side and Germans along the other. Score Resets. 14 start, random draw, 6 games, 14 move on. Games: 7 player, Standard, random spoils, random fog, adj forts, TRENCH. Maps - Trench Warfare, Siege
Round 5. This was a death trap for our boys. 14 start, random draw, 8 games, 8 move on. Games 7 player, Standard, random Nuclear/Zombie spoils, random fog, chained forts. Maps - Island of Doom, Madness.
Round 6. Beaumont Hamel plunged Newfoundland and Labrador into a period of mourning. 8 start, 8 games. Games 8 player, Standard, random flat rate/esc/no spoils, Fog, chained forts. Maps - France 2.1, Unification Germany, British Isles, Golfe Du Saint-Laurent.
-- MJ
Of all the battles that the Newfoundland Regiment fought during the First World War, none was as devastating or as defining as the first day of the Battle of the Somme. The Regiment's tragic advance at Beaumont Hamel on the morning of July 1, 1916 became an enduring symbol of its valour and of its terrible wartime sacrifices. The events of that day were forever seared into the cultural memory of the Newfoundland and Labrador people.
The Newfoundland Regiment was stationed in trenches near the French village of Beaumont Hamel, which lay behind German lines. It was a strategically difficult position. The German front lines were about 300 to 500 metres away, down a grassy slope and heavily guarded by barbed wire entanglements. The German 119th Reserve Regiment, tough and experienced, had turned the natural defences of a deep Y-shaped ravine into one of the strongest positions on the entire Somme front. The Newfoundland Regiment's assignment (along with the rest of the 88th Brigade) was to seize control of the German trenches near the village of Beaumont Hamel. The Regiment would be part of a third wave of attackers to leave Allied trenches.
As the first wave of Allied troops left their trenches at 7:30, they were greeted by a devastating barrage of enemy artillery and machine gun fire. It was far stronger than anyone had anticipated. Most men were killed or wounded in minutes. A second wave of troops left their trenches soon after and met with the same fate. The Newfoundland Regiment was still in its trenches, awaiting orders to go over the top as part of a third wave of attack.
The men left their trenches at 9:15 a.m., with orders to seize the first and second lines of enemy trenches. But as they moved down the exposed slope towards No Man's Land, no friendly fire covered their advance. Instead, German cross-fire cut across the advancing columns of men, killing or wounding most of them before they even reached No Man's Land.
The attack was a devastating failure. In a single morning, almost 20,000 British troops died, and another 37,000 were wounded. The Newfoundland Regiment had been almost wiped out. When roll call was taken, only 68 men answered their names - 324 were killed, or missing and presumed dead, and 386 were wounded.
Above text and images are excerpts from Heritage Newfoundland & Labrador http://www.heritage.nf.ca/ website
Read all the details at http://www.heritage.nf.ca/first-world-w ... mel-en.php
Round 1. Germany had marched through Belgium and into northern France. 24 start, Random Draw, 6 games, 24 move on. Games: 8 players, Standard, Flat rate, random fog, adj forts. Maps - France, BeNeLux, Germany
Round 2. Newfoundland Regiment is with the 88th Brigade of the 29th Division. 24 start, Random Draw, 6 games, 18 move on. Games: 4 player, Terminator, No spoils, no fog, unlimited forts. Maps - Wales, Scotland, England
Round 3. Many soldiers sent letters home in the days before the battle. 18 start, random Draw, 6 games, 14 move on. Games: 9 player, Terminator, Esc, no fog, chained forts. Maps - Canada, North America, Golfe Du Saint-Laurent
Round 4. Allied trenches stretched along one side and Germans along the other. Score Resets. 14 start, random draw, 6 games, 14 move on. Games: 7 player, Standard, random spoils, random fog, adj forts, TRENCH. Maps - Trench Warfare, Siege
Round 5. This was a death trap for our boys. 14 start, random draw, 8 games, 8 move on. Games 7 player, Standard, random Nuclear/Zombie spoils, random fog, chained forts. Maps - Island of Doom, Madness.
Round 6. Beaumont Hamel plunged Newfoundland and Labrador into a period of mourning. 8 start, 8 games. Games 8 player, Standard, random flat rate/esc/no spoils, Fog, chained forts. Maps - France 2.1, Unification Germany, British Isles, Golfe Du Saint-Laurent.
-- MJ
bazentin ridge i
Battle of Bazentin Ridge July 14-17, 1916
The disastrous opening of the Battle of the Somme on is still remembered as the bloodiest day in British military history, but it was merely the beginning of five months of horror that resulted in 1.3 million casualties on both sides, including 310,486 killed and missing. The lion’s share of these were inflicted in a series of incremental Allied offensives throughout the summer and fall of 1916, as the British and French pushed forward again and again in search of an ever-elusive breakthrough.
The second big push fell just two weeks after the first assault, during the Battle of Bazentin Ridge from July 14-17, when the British scored a rare victory but then failed to exploit it, giving the Germans a chance to regroup and dig in again – by now a frustratingly familiar result on those rare occasions when either side scored a success.
In the early morning of July 14, the shelling culminated in a five-minute “hurricane” bombardment. By 10 a.m. on July 14, the British 3rd and 7th Divisions had torn a hole in the German defenses, clearing the way for an advance into the High Wood north of Bazentin le Petit, but the divisional commanders were under orders to hold their positions and couldn’t call on reinforcements, which were being held in reserve in case of potential German counterattacks elsewhere.
Meanwhile the British attack didn’t succeed everywhere: the 9th Division in particular, attacking the German lines near the village of Longueval, suffered very heavy casualties as it tried to push the Germans out of Delville Wood. South African troops continued to battle for Longueval and Delville Wood from July 14 to July 17, but the planned cavalry attack was called off after an abortive advance by the Indian cavalry division revealed the Germans were still well entrenched.
By July 17, the arrival of growing numbers of German reinforcements finally spelled the end of the fleeting British success at Bazentin Ridge.

Above text and image are excerpts from Mental Floss http://mentalfloss.com/
Read all the details at http://mentalfloss.com/article/83219/ww ... ntin-ridge
Round 1. The British scored a rare victory but then failed to exploit it. 25 start, Random Draw, 6 games, 25 move on. Games: 1 point per game, 5 players, Standard, Flat rate, fog, random adjacent/chained/parachute forts. Maps - British Isles, Classic Cities: London, England
Round 2. Douglas Haig ordered the Fourth Army to push ahead on the southern front. 25 start, Random Draw, 6 games, 20 move on. Games: 2 points per game, 5 players, Standard, Esc, random fog, unlimited forts. Maps - WWII Western Front, WWII Eastern Front, Europe
Round 3. Indian cavalry hindered by shell holes and debris strewn across the battlefield. 20 start, Random Draw, 6 games, 15 move on. Games: 3 points per game, 5 players, Standard, Flat rate, no fog, adj forts. Maps - Indian Empire, South Africa 1885, Dark Continent
Round 4. The situation remained a stalemate – albeit an extremely violent one. 15 start, Random Draw, 6 games, 5 move on. Games: 4 points per game, 5 players, Terminator, random Esc/flat/no spoils, fog, chained forts. Maps - Halloween Hollows, Salem's Switch, Monsters
Round 5. German reinforcements finally spelled the end of the fleeting British success. 5 start, Random Draw, 9 games. Games: 5 points per game, 5 players, Standard, Esc, no fog, unlimited forts. Maps - Germany, Holy Roman Empire, France 1789
-- MJ
The disastrous opening of the Battle of the Somme on is still remembered as the bloodiest day in British military history, but it was merely the beginning of five months of horror that resulted in 1.3 million casualties on both sides, including 310,486 killed and missing. The lion’s share of these were inflicted in a series of incremental Allied offensives throughout the summer and fall of 1916, as the British and French pushed forward again and again in search of an ever-elusive breakthrough.
The second big push fell just two weeks after the first assault, during the Battle of Bazentin Ridge from July 14-17, when the British scored a rare victory but then failed to exploit it, giving the Germans a chance to regroup and dig in again – by now a frustratingly familiar result on those rare occasions when either side scored a success.
In the early morning of July 14, the shelling culminated in a five-minute “hurricane” bombardment. By 10 a.m. on July 14, the British 3rd and 7th Divisions had torn a hole in the German defenses, clearing the way for an advance into the High Wood north of Bazentin le Petit, but the divisional commanders were under orders to hold their positions and couldn’t call on reinforcements, which were being held in reserve in case of potential German counterattacks elsewhere.
Meanwhile the British attack didn’t succeed everywhere: the 9th Division in particular, attacking the German lines near the village of Longueval, suffered very heavy casualties as it tried to push the Germans out of Delville Wood. South African troops continued to battle for Longueval and Delville Wood from July 14 to July 17, but the planned cavalry attack was called off after an abortive advance by the Indian cavalry division revealed the Germans were still well entrenched.
By July 17, the arrival of growing numbers of German reinforcements finally spelled the end of the fleeting British success at Bazentin Ridge.
Above text and image are excerpts from Mental Floss http://mentalfloss.com/
Read all the details at http://mentalfloss.com/article/83219/ww ... ntin-ridge
Round 1. The British scored a rare victory but then failed to exploit it. 25 start, Random Draw, 6 games, 25 move on. Games: 1 point per game, 5 players, Standard, Flat rate, fog, random adjacent/chained/parachute forts. Maps - British Isles, Classic Cities: London, England
Round 2. Douglas Haig ordered the Fourth Army to push ahead on the southern front. 25 start, Random Draw, 6 games, 20 move on. Games: 2 points per game, 5 players, Standard, Esc, random fog, unlimited forts. Maps - WWII Western Front, WWII Eastern Front, Europe
Round 3. Indian cavalry hindered by shell holes and debris strewn across the battlefield. 20 start, Random Draw, 6 games, 15 move on. Games: 3 points per game, 5 players, Standard, Flat rate, no fog, adj forts. Maps - Indian Empire, South Africa 1885, Dark Continent
Round 4. The situation remained a stalemate – albeit an extremely violent one. 15 start, Random Draw, 6 games, 5 move on. Games: 4 points per game, 5 players, Terminator, random Esc/flat/no spoils, fog, chained forts. Maps - Halloween Hollows, Salem's Switch, Monsters
Round 5. German reinforcements finally spelled the end of the fleeting British success. 5 start, Random Draw, 9 games. Games: 5 points per game, 5 players, Standard, Esc, no fog, unlimited forts. Maps - Germany, Holy Roman Empire, France 1789
-- MJ
bazentin ridge II
-------The Battle of Bazentin Ridge...July 14th,1916/Story Line...
----------Tis I Wayward day. I still find myself in the bend of the River Somme. I feel like I am in a Jimmy Stewart movie . But instead of a cattle drive. This bend in the river is filled with mounds of dead bodies. It is a moonless night this evening. Our commanding officer General Henry Rawlinson has given us the go time. For our attack on the German lines. July 14th,1916 at 3:25 a.m.. 4 divisions of the B.E.F.'s 4th army is going to slam into General Fritz von Below's 2nd German Army. On a front that is 6,000 yds(5.5km) long.
------We find ourselves just down from the German lines, which run from just past Guillemont and Ginchy. Northwest along the crest of Bazentin Ridge to Pozieres. Down the Albert Bapaume road. The attack plan laid out to us. Is to take the villages of Bazentin le Petit, Bazentin le Grand and also Longueval. They all lay adjacent to Delvillewood,and the Highwood on the ridge beyond.
------I hear footsteps behind me. As I turn around, I hear "Major, chin up old boy!" Why it is General Henry Rawlinson himself. The General seems optimistic about his plan. I ask him, how he chose this plan. He says,"I'm choosing to attack at dawn, when there will be no natural light for the German machine gunners to see far ahead." "What about our artillery General?",I whispered. "Well,you see I have decided ,when the attack is to start. To maintain surprise, the infantry were to be preceded by a 5 minute hurricane bombardment. Rather than the 30 minute barrage the Germans are use to. After that, a creeping bombardment, as the infantry moves forward.",he stated. He then walked away towards the battle room. As I watch the General walk away. I can't help but think of the men. When the attack begins. They will be attacking up hill the whole way.
------I head in the opposite direction, and bump into SGT. Jones. He is one of the engineers. "What are you up to Sarge?",I ask. Jones says,"I have been crawling in the mud and over dead bodies all day. My unit has been cutting German barbwire for hours." "There is a massive brewing.",I say. Jones whispers,"I tell you something Major. As I was working out there. Cutting the barbwire. My unit discovered the Germans have been listening to the telephones of the 63rd Brigade. So word around our unit. Is H.Q. has tricked the Germans with a fake message. That operations have been postponed for the time being." As he smiled. I laughed,"Well maybe we can fool'em."
------Pvt. Mchugh came towards us. "I can hear you guys", he said. "As you been cutting Sarge, I have been laying down tape and markers. So the men can advance in the dark. I've been on my stomach all day and night.", he muttered.
------Just then the sky lit up. I looked at my pocket watch. It is 3:20 a.m.,the attack has begun. The hurricane bombardment has cracked open the night. I think of all the new German troops under that barrage of fire and steel. A RFC pilot told me yesterday. He has been watching many German troop trains coming this way. They have been traveling from Flanders. It is now 3:25 a.m. the bombardment has slowed down and there go the men. They will be attacking Trones wood sector first. Lucky for them ,last night the 4th army was able to assemble 22,000 men and supplies 500 yds closer to the Germans with out being noticed. As reports come in. The attack started out with a miss hap. The attack started out to the east of Trones wood. The men thought they were attacking north. As the troops advanced, they could not stop the Germans from fixing the cut barbwire. Because of the long high grass, made it had to see. The men of the 7th division are exhausted. They have had 5 days rest. Before they were brought back for this battle. There has been no time to replace it's lost men.
------The 4th army is making gains, but slowly. From this news the High Command tried an attack in the daylight, with the 10th Cheshire on the village of Ovillers. But were cut down by German machine guns. They tried again at night. Succeeded in taking Ovillers. But lost so many men, they had to withdraw. All along the German lines, the British infantry advanced forward through the mist. With just enough light to tell German troops from British ones. They pushed through 2 German trench lines, through the barbwire. German positions fell one after the other. A lot of Germans troops escaped. Because many of the British troops lacked the training to hit soldiers beyond 300 yds.
------As a few German prisoners are brought in. I talk to one. He tells me and shows me a piece of paper. It is an order from German General Fritz von Below. It reads,"Despite my ban on the voluntary relinquishment of Positions, apparently certain sectors have been evacuated without an enemy attack. Every commander is responsible for ensuring , that his troops fight to the last man, to defend the sector for which he is responsible. Failure to do so will lead to Court Martial proceedings. THIS ARMY ORDER is to be made known to all commanders."---Below,July 14th, 1916...
------As time passed ,a message runner from the Longueval alley trench came running up. "Hey,Stanley Spencer!",I shouted. Stanley ran over to me. I asked him,"How are things in the alley?" As he looked at me with a sad face,trying to catch his breathe. He answered,"Just awful,In the trenches of Longueval alley. Many bodies have been covered by loose earth. From the sides of the trenches caving in. The bodies under the dirt form a springy, cushiony floor. It gives an unpleasant feeling,when walking on them." He also says,"H.Q. has been getting false reports on the battle for Longueval. Reports of capture of Longueval is untrue. Which has been leading the High Command the wrong way. Making them make all kinds of blunders. The truth is the Germans are holding onto the north part of Longueval. It is stopping the troops from advancing west. The Germans are also counter attacking and fortifying their positions at Longueval." He then takes off towards H.Q.. More reports of the battle come in. As a lull fell over the battlefield. Except where South Africans continue to attack German machine gun fire at Longueval.
------As the 15th of July begins. The Germans are still holding on to Delvillewood and Longueval. Which is giving cover for attacking German troops brought up from Flers. The Highlander light infantry and the Scottish rifle corps, were sent to take Highwood. They were soon joined by the King's Royal rifle corps. But they all were driven back. The High Command has judged Highwood to be untenable, an should be bombarded back to the stone age.
------The 16th and 17th of July brought much of the same poor judgement of the High Command. The 4th army leaders demanded the Highwood be taken by dawn. The British brought their artillery closer. When they should have moved it back to a safer distance, along with the infantry. German artillery fire, cut all the telephone lines. The German infantry counter attacked. British troops are being slowed down by mud. When they try to bring shells and troops up to the fight. More important , the bombardment at Highwood. Is failing to destroy the German machine guns.
------Although this stage in the fight for the Somme is looking like a British victory. The rain is stopping French troops from coming to the aid of the British. The time wasted by Rawlinson has been horrible. At one point a handful of British soldiers walked into the Highwood unopposed. Rawlinson decided to wait for the cavalry. He could of sent the infantry into the Highwood. When he finally sent the cavalry in, hours later. The Germans had plugged up the holes in their lines. German machine gunners ,cut down Rawlinson's cavalry. Also with the wasted time. More ground all over the battlefield could have been taken. After the battle for Bazentin Ridge. Most attacks on both sides were defeated by defensive fire power and the inclement weather. Which frequently turned the battlefield into a slough of mud. As I look over the battlefield through my field glasses. All I can see aside from the human death. Is the ruins of walls were buildings once stood. The sticks of trees that found nesting places among the debris. The whole landscape has become what looks like a volcanic uproar.
------As I turn and head back to H.Q. my satchel still isn't glowing. It looks like I'm still stuck on the Somme. But that's o.k. ,because a special person is reported to be in the Delvillewood sector. We will find out more in the battle of Delvillewood.
-------The Battle of Bazentin Ridge.../Tournament...-------
---1/7.......................16 player tournament......---------
--------Wayward Day's Diary: July 14th,1916
----The Battle of Baznentin Ridge could be called a British Victory. Fought between the British 4th army under the command of General Henry Rawlinson. Up against the German 2nd army of General Fritz von Below. As the British slowly made small gains moving forward. In the closing of the battle. Attempts to use the opportunity of early success. To capture Highwood failed. Due to German success in holding onto the northend of Longueval and parts of Delvillewood. From which attacks on Highwood ,could be engaged from the flank. Along with poor weather , mud slowed the attack. To add to the bad waste of time by H.Q.. Not sending cavalry in sooner. When they decided to. The Germans had regrouped and repelled the cavalry. Also the cavalry was delayed by the destroyed ground , shell holes and trenches. But all and all a some what...British Victory...
Round 1:(France map)
16 players start and 16 move on.Map:France,1-vs-1,5 games :Standard,Auto,Sequential,(Flat Rate,Nuclear,Zombie),(Chained,Adjacent),Fog,Trench,30 rounds.
Round 2:(England,Germany,Duck and Cover:Bombardment Begins)
16 players start and 8 move on. Maps:England,Germany,Duck and Cover:4-4 player games, 2 on England,2 on Germany, 2 on Duck and Cover: Terminator,Auto,Sequential,(Flat Rate,Nuclear,Zombie),(Chained,Adjacent),Fog,Trench,30 rounds.
Round 3:(British Isles---B.E.F. pushing forward)
8 players start and 8 move on.Map: British Isles,1-vs-1,5 games :Standard,Auto,Sequential,(Escalating,Flat Rate),Chained,Fog,30 rounds.
Round 4:(Classic Cities:London,Indian Empire--Rawlinson birth and death places)
8 players start and 6 move on.Maps:C.C.:London,Indian Empire:2-4 player games,2 on C.C.:London,2 on Indian Empire: Assassin,Auto,Sequential, Flat Rate, Chained, Fog, Trench, 30 rounds.
Round 5:(Flanders 1302,Rail Europe--Germany moved troops from Flanders by Rail)
6 players start and 4 move on.Maps: Flanders 1302,Rail Europe:1-6 player games,2 on Flanders 1302, 2 on Rail Europe: Terminator, Auto, Sequential, Escalating, Chained, Fog ,30 rounds.
Round 6:(Scotland,South Africa 1885--Scotts and South Africans joined the battle)
4 players start and 2 move on. Maps:Scotland,South Africa 1885: 1-4 player games, 3 on Scotland, 3 on South Africa 1885: Assassin, Auto, Sequential,(Flat Rate,Nuclear,Zombie),(Chained,Adjacent),Fog,Trench,30 rounds.
Round 7:(Trench Warfare)
2 players start:Map: Trench Warfare: 1-vs-1, 9 games, Standard, Auto, Sequential,(Flat Rate,Nuclear,Zombie),(Chained,Adjacent),Fog,Trench,30 rounds.
-- CSS
----------Tis I Wayward day. I still find myself in the bend of the River Somme. I feel like I am in a Jimmy Stewart movie
------We find ourselves just down from the German lines, which run from just past Guillemont and Ginchy. Northwest along the crest of Bazentin Ridge to Pozieres. Down the Albert Bapaume road. The attack plan laid out to us. Is to take the villages of Bazentin le Petit, Bazentin le Grand and also Longueval. They all lay adjacent to Delvillewood,and the Highwood on the ridge beyond.
------I hear footsteps behind me. As I turn around, I hear "Major, chin up old boy!" Why it is General Henry Rawlinson himself. The General seems optimistic about his plan. I ask him, how he chose this plan. He says,"I'm choosing to attack at dawn, when there will be no natural light for the German machine gunners to see far ahead." "What about our artillery General?",I whispered. "Well,you see I have decided ,when the attack is to start. To maintain surprise, the infantry were to be preceded by a 5 minute hurricane bombardment. Rather than the 30 minute barrage the Germans are use to. After that, a creeping bombardment, as the infantry moves forward.",he stated. He then walked away towards the battle room. As I watch the General walk away. I can't help but think of the men. When the attack begins. They will be attacking up hill the whole way.
------I head in the opposite direction, and bump into SGT. Jones. He is one of the engineers. "What are you up to Sarge?",I ask. Jones says,"I have been crawling in the mud and over dead bodies all day. My unit has been cutting German barbwire for hours." "There is a massive brewing.",I say. Jones whispers,"I tell you something Major. As I was working out there. Cutting the barbwire. My unit discovered the Germans have been listening to the telephones of the 63rd Brigade. So word around our unit. Is H.Q. has tricked the Germans with a fake message. That operations have been postponed for the time being." As he smiled. I laughed,"Well maybe we can fool'em."
------Pvt. Mchugh came towards us. "I can hear you guys", he said. "As you been cutting Sarge, I have been laying down tape and markers. So the men can advance in the dark. I've been on my stomach all day and night.", he muttered.
------Just then the sky lit up. I looked at my pocket watch. It is 3:20 a.m.,the attack has begun. The hurricane bombardment has cracked open the night. I think of all the new German troops under that barrage of fire and steel. A RFC pilot told me yesterday. He has been watching many German troop trains coming this way. They have been traveling from Flanders. It is now 3:25 a.m. the bombardment has slowed down and there go the men. They will be attacking Trones wood sector first. Lucky for them ,last night the 4th army was able to assemble 22,000 men and supplies 500 yds closer to the Germans with out being noticed. As reports come in. The attack started out with a miss hap. The attack started out to the east of Trones wood. The men thought they were attacking north. As the troops advanced, they could not stop the Germans from fixing the cut barbwire. Because of the long high grass, made it had to see. The men of the 7th division are exhausted. They have had 5 days rest. Before they were brought back for this battle. There has been no time to replace it's lost men.
------The 4th army is making gains, but slowly. From this news the High Command tried an attack in the daylight, with the 10th Cheshire on the village of Ovillers. But were cut down by German machine guns. They tried again at night. Succeeded in taking Ovillers. But lost so many men, they had to withdraw. All along the German lines, the British infantry advanced forward through the mist. With just enough light to tell German troops from British ones. They pushed through 2 German trench lines, through the barbwire. German positions fell one after the other. A lot of Germans troops escaped. Because many of the British troops lacked the training to hit soldiers beyond 300 yds.
------As a few German prisoners are brought in. I talk to one. He tells me and shows me a piece of paper. It is an order from German General Fritz von Below. It reads,"Despite my ban on the voluntary relinquishment of Positions, apparently certain sectors have been evacuated without an enemy attack. Every commander is responsible for ensuring , that his troops fight to the last man, to defend the sector for which he is responsible. Failure to do so will lead to Court Martial proceedings. THIS ARMY ORDER is to be made known to all commanders."---Below,July 14th, 1916...
------As time passed ,a message runner from the Longueval alley trench came running up. "Hey,Stanley Spencer!",I shouted. Stanley ran over to me. I asked him,"How are things in the alley?" As he looked at me with a sad face,trying to catch his breathe. He answered,"Just awful,In the trenches of Longueval alley. Many bodies have been covered by loose earth. From the sides of the trenches caving in. The bodies under the dirt form a springy, cushiony floor. It gives an unpleasant feeling,when walking on them." He also says,"H.Q. has been getting false reports on the battle for Longueval. Reports of capture of Longueval is untrue. Which has been leading the High Command the wrong way. Making them make all kinds of blunders. The truth is the Germans are holding onto the north part of Longueval. It is stopping the troops from advancing west. The Germans are also counter attacking and fortifying their positions at Longueval." He then takes off towards H.Q.. More reports of the battle come in. As a lull fell over the battlefield. Except where South Africans continue to attack German machine gun fire at Longueval.
------As the 15th of July begins. The Germans are still holding on to Delvillewood and Longueval. Which is giving cover for attacking German troops brought up from Flers. The Highlander light infantry and the Scottish rifle corps, were sent to take Highwood. They were soon joined by the King's Royal rifle corps. But they all were driven back. The High Command has judged Highwood to be untenable, an should be bombarded back to the stone age.
------The 16th and 17th of July brought much of the same poor judgement of the High Command. The 4th army leaders demanded the Highwood be taken by dawn. The British brought their artillery closer. When they should have moved it back to a safer distance, along with the infantry. German artillery fire, cut all the telephone lines. The German infantry counter attacked. British troops are being slowed down by mud. When they try to bring shells and troops up to the fight. More important , the bombardment at Highwood. Is failing to destroy the German machine guns.
------Although this stage in the fight for the Somme is looking like a British victory. The rain is stopping French troops from coming to the aid of the British. The time wasted by Rawlinson has been horrible. At one point a handful of British soldiers walked into the Highwood unopposed. Rawlinson decided to wait for the cavalry. He could of sent the infantry into the Highwood. When he finally sent the cavalry in, hours later. The Germans had plugged up the holes in their lines. German machine gunners ,cut down Rawlinson's cavalry. Also with the wasted time. More ground all over the battlefield could have been taken. After the battle for Bazentin Ridge. Most attacks on both sides were defeated by defensive fire power and the inclement weather. Which frequently turned the battlefield into a slough of mud. As I look over the battlefield through my field glasses. All I can see aside from the human death. Is the ruins of walls were buildings once stood. The sticks of trees that found nesting places among the debris. The whole landscape has become what looks like a volcanic uproar.
------As I turn and head back to H.Q. my satchel still isn't glowing. It looks like I'm still stuck on the Somme. But that's o.k. ,because a special person is reported to be in the Delvillewood sector. We will find out more in the battle of Delvillewood.
-------The Battle of Bazentin Ridge.../Tournament...-------
---1/7.......................16 player tournament......---------
--------Wayward Day's Diary: July 14th,1916
----The Battle of Baznentin Ridge could be called a British Victory. Fought between the British 4th army under the command of General Henry Rawlinson. Up against the German 2nd army of General Fritz von Below. As the British slowly made small gains moving forward. In the closing of the battle. Attempts to use the opportunity of early success. To capture Highwood failed. Due to German success in holding onto the northend of Longueval and parts of Delvillewood. From which attacks on Highwood ,could be engaged from the flank. Along with poor weather , mud slowed the attack. To add to the bad waste of time by H.Q.. Not sending cavalry in sooner. When they decided to. The Germans had regrouped and repelled the cavalry. Also the cavalry was delayed by the destroyed ground , shell holes and trenches. But all and all a some what...British Victory...
Round 1:(France map)
16 players start and 16 move on.Map:France,1-vs-1,5 games :Standard,Auto,Sequential,(Flat Rate,Nuclear,Zombie),(Chained,Adjacent),Fog,Trench,30 rounds.
Round 2:(England,Germany,Duck and Cover:Bombardment Begins)
16 players start and 8 move on. Maps:England,Germany,Duck and Cover:4-4 player games, 2 on England,2 on Germany, 2 on Duck and Cover: Terminator,Auto,Sequential,(Flat Rate,Nuclear,Zombie),(Chained,Adjacent),Fog,Trench,30 rounds.
Round 3:(British Isles---B.E.F. pushing forward)
8 players start and 8 move on.Map: British Isles,1-vs-1,5 games :Standard,Auto,Sequential,(Escalating,Flat Rate),Chained,Fog,30 rounds.
Round 4:(Classic Cities:London,Indian Empire--Rawlinson birth and death places)
8 players start and 6 move on.Maps:C.C.:London,Indian Empire:2-4 player games,2 on C.C.:London,2 on Indian Empire: Assassin,Auto,Sequential, Flat Rate, Chained, Fog, Trench, 30 rounds.
Round 5:(Flanders 1302,Rail Europe--Germany moved troops from Flanders by Rail)
6 players start and 4 move on.Maps: Flanders 1302,Rail Europe:1-6 player games,2 on Flanders 1302, 2 on Rail Europe: Terminator, Auto, Sequential, Escalating, Chained, Fog ,30 rounds.
Round 6:(Scotland,South Africa 1885--Scotts and South Africans joined the battle)
4 players start and 2 move on. Maps:Scotland,South Africa 1885: 1-4 player games, 3 on Scotland, 3 on South Africa 1885: Assassin, Auto, Sequential,(Flat Rate,Nuclear,Zombie),(Chained,Adjacent),Fog,Trench,30 rounds.
Round 7:(Trench Warfare)
2 players start:Map: Trench Warfare: 1-vs-1, 9 games, Standard, Auto, Sequential,(Flat Rate,Nuclear,Zombie),(Chained,Adjacent),Fog,Trench,30 rounds.
-- CSS
seventh isonzo
Freemium friendly Seventh Battle of the Isonzo, September 14-17, 1916
Since it joined the war Italy has launched a series of offensives along the Isonzo. Most of these have been bloody failures.
But the last offensive, the sixth, saw the Austro-Hungarian pushed back as the Italians surged forward and captured Gorizia. That success was unexpected. The Italians were hoping only for minor gains and were unprepared to exploit their breakthrough, allowing the Austro-Hungarians to fall back and establish new defensive lines.
In preparation for another attack Italian artillery has been blasting the enemy for the last few days. However the bombardment’s effectiveness has been diminished by poor weather, which had made it difficult to observe the enemy lines. The Austro-Hungarians have also carefully camouflaged their positions, so the Italians are more or less firing their guns blind and hoping for the best.
Now Cadorna sends the infantry forward. The Austro-Hungarians are being pressed by the Russians in Galicia and the Romanians in Transylvania, so he hopes that this Italian assault will be the hammer blow that breaks their resistance.
Unfortunately the battle goes more like the first five Isonzo battles than the sixth. Italian troops emerge from their trenches and begin to move forward, adopting close-order formations like something from the Napoleonic Wars. Then the Austro-Hungarians open up with their hidden field artillery and machine-guns, cutting great holes in the Italian columns. To one Austro-Hungarian officer the Italian attack looks like “an attempt at mass suicide”.
Gains are minimal and often lost to Austro-Hungarian counter-attacks. The sixth battle is revealed as an aberration as the Isonzo returns to its normal pattern of bloody stalemate.
Above text is from article: https://ww1live.wordpress.com/2016/09/14/isonzo-24/

Image is from same article listed above
(This tournament is freemium-friendly but NOT "freemium exemption". You must keep 1 slot available for the duration!)
Battles:
Round 1. Italy launched a series of offensives along the Isonzo. 32 start, Random Draw, 1 game, 32 move on. Games: 2 players, Auto deployment, Flat Rate, no fog, chained forts. Map - Italy
Round 2. The sixth battle saw the Austro-Hungarian pushed back. 32 start, Random Draw, 1 game, 32 move on. Games: 2 players, Auto deployment, Escalating, fog, unlimited forts. Map - Austro-Hungarian Empire
Round 3. The Italians were unprepared to exploit their breakthrough. 32 start, Random Draw, 1 game, 16 move on. Games: 2 players, Auto deployment, No spoils, fog, parachute forts. Map - Imperium Romanum
Round 4. Artillery blasting the enemy for the last few days. 16 start, Score Resets, Random Draw, 1 game, 16 move on. Games: 2 players, Manual deployment, Flat Rate, no fog, chained forts. Map - WWII Western Front
Round 5. Hopes that this Italian assault will be the hammer blow. 16 start, Random Draw, 1 game, 16 move on. Games: 2 players, Manual deployment, Escalating Spoils, fog, unlimited forts. Map - Unification Italy
Round 6. Italian troops emerge from their trenches. 16 start, Random Draw, 1 game, 8 move on. Games: 2 players, Manual deployment, No spoils, no fog, parachute forts. Map - Trench Warfare
Round 7. Italians adopted close-order formations like the Napoleonic Wars. 8 start, Score resets, Random Draw, 1 game, 4 move on. Games: 2 players, Polymorphic (2), Auto deployment, Flat rate, no fog, unlimited forts. Map - Napoleonic Europe
Round 8. Austro-Hungarians cut great holes in the Italian columns. 4 start, Random Draw, 1 game, 2 move on. Games: 2 players, Polymorphic (3), Auto deployment, Escalating Spoils, fog, parachute forts. Map - King Of The Mountains
Round 9. Isonzo returns to its normal pattern of bloody stalemate. 2 start, Random Draw, 1 game, Games: 2 players, Polymorphic (4), Auto deployment, No Spoils, fog, chained forts. Map - Poison Rome
-- MJ
Since it joined the war Italy has launched a series of offensives along the Isonzo. Most of these have been bloody failures.
But the last offensive, the sixth, saw the Austro-Hungarian pushed back as the Italians surged forward and captured Gorizia. That success was unexpected. The Italians were hoping only for minor gains and were unprepared to exploit their breakthrough, allowing the Austro-Hungarians to fall back and establish new defensive lines.
In preparation for another attack Italian artillery has been blasting the enemy for the last few days. However the bombardment’s effectiveness has been diminished by poor weather, which had made it difficult to observe the enemy lines. The Austro-Hungarians have also carefully camouflaged their positions, so the Italians are more or less firing their guns blind and hoping for the best.
Now Cadorna sends the infantry forward. The Austro-Hungarians are being pressed by the Russians in Galicia and the Romanians in Transylvania, so he hopes that this Italian assault will be the hammer blow that breaks their resistance.
Unfortunately the battle goes more like the first five Isonzo battles than the sixth. Italian troops emerge from their trenches and begin to move forward, adopting close-order formations like something from the Napoleonic Wars. Then the Austro-Hungarians open up with their hidden field artillery and machine-guns, cutting great holes in the Italian columns. To one Austro-Hungarian officer the Italian attack looks like “an attempt at mass suicide”.
Gains are minimal and often lost to Austro-Hungarian counter-attacks. The sixth battle is revealed as an aberration as the Isonzo returns to its normal pattern of bloody stalemate.
Above text is from article: https://ww1live.wordpress.com/2016/09/14/isonzo-24/
Image is from same article listed above
(This tournament is freemium-friendly but NOT "freemium exemption". You must keep 1 slot available for the duration!)
Battles:
Round 1. Italy launched a series of offensives along the Isonzo. 32 start, Random Draw, 1 game, 32 move on. Games: 2 players, Auto deployment, Flat Rate, no fog, chained forts. Map - Italy
Round 2. The sixth battle saw the Austro-Hungarian pushed back. 32 start, Random Draw, 1 game, 32 move on. Games: 2 players, Auto deployment, Escalating, fog, unlimited forts. Map - Austro-Hungarian Empire
Round 3. The Italians were unprepared to exploit their breakthrough. 32 start, Random Draw, 1 game, 16 move on. Games: 2 players, Auto deployment, No spoils, fog, parachute forts. Map - Imperium Romanum
Round 4. Artillery blasting the enemy for the last few days. 16 start, Score Resets, Random Draw, 1 game, 16 move on. Games: 2 players, Manual deployment, Flat Rate, no fog, chained forts. Map - WWII Western Front
Round 5. Hopes that this Italian assault will be the hammer blow. 16 start, Random Draw, 1 game, 16 move on. Games: 2 players, Manual deployment, Escalating Spoils, fog, unlimited forts. Map - Unification Italy
Round 6. Italian troops emerge from their trenches. 16 start, Random Draw, 1 game, 8 move on. Games: 2 players, Manual deployment, No spoils, no fog, parachute forts. Map - Trench Warfare
Round 7. Italians adopted close-order formations like the Napoleonic Wars. 8 start, Score resets, Random Draw, 1 game, 4 move on. Games: 2 players, Polymorphic (2), Auto deployment, Flat rate, no fog, unlimited forts. Map - Napoleonic Europe
Round 8. Austro-Hungarians cut great holes in the Italian columns. 4 start, Random Draw, 1 game, 2 move on. Games: 2 players, Polymorphic (3), Auto deployment, Escalating Spoils, fog, parachute forts. Map - King Of The Mountains
Round 9. Isonzo returns to its normal pattern of bloody stalemate. 2 start, Random Draw, 1 game, Games: 2 players, Polymorphic (4), Auto deployment, No Spoils, fog, chained forts. Map - Poison Rome
-- MJ
guillemont
Battle of Guillemont, September 3rd to 6th, 1916
Progress on this eastern flank of the British line was essential if the French and British were to cooperate properly north of the Somme. By the start of September the capture of Guillemont was becoming more urgent, as the plans for an attack north toward Flers and Courcelette began to take shape.
The successful attack on Guillemont was made by XIV corps, and was led by the 20th Division, with the 5th Division to their right. Their target was Leuze Wood, 1,500 yards beyond the village, on a ridge overlooking the village of Combles.
The southern part of the attack on 3 September suffered the most heavily. There the 13th Brigade had been relying on the French for a final bombardment of their objective, Falfemont Farm, but the French became stuck in Combles Ravine, and were unable to make and progress. The leading waves of the first battalion to attack were wiped out by German fire. To their left the 95th Brigade (5th Division) captured its first three objectives, and reached a line east of Guillemont.
The 20th Division attack on Guillemont began from a series of trenches very close to the German front line. The village itself had been destroyed by repeated artillery bombardments, but underneath it was a maze of German strong points. Despite this the 20th Division attack succeeded, captured its three objectives and reaching the Ginchy-Wedge Wood road, east of Guillemont. Elsewhere British attacks on Ginchy and further west around the front met with little or no success on 3 September.
The advance east of Guillemont continued over the next three days. By the end of 6 September the British had reached their target line, around Leuze Wood, and were ready to turn north to deal with Ginchy. Everything would soon be in place for the next big attack, at Flers-Courcelette.
Above text is from article: Rickard, J (21 September 2007), Battle of Guillemont, 3-6 September 1916, http://www.historyofwar.org/articles/ba ... emont.html
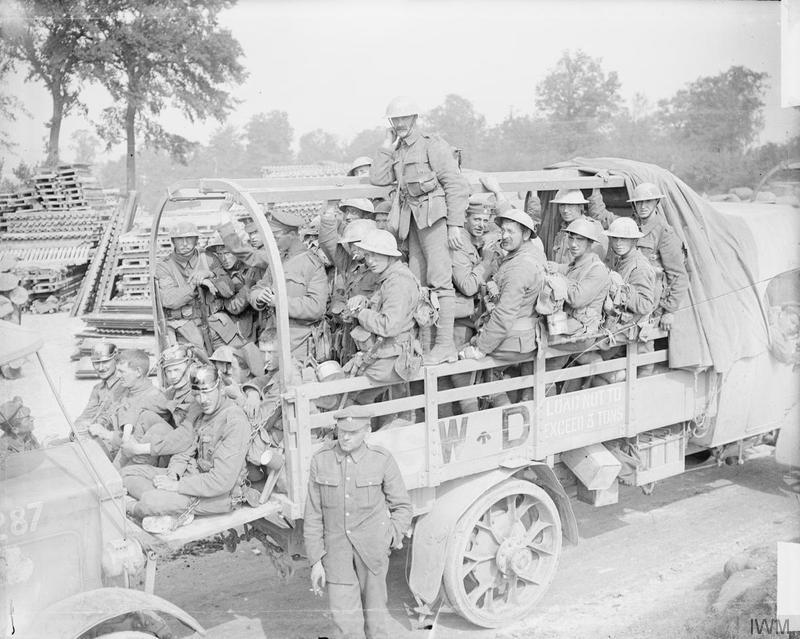
Image is from guernseydonkey.com, showing the 6th Royal Irish regiment, as they were heading back for a rest after taking Guillemont
Battles:
Round 1. The 6th Royal Irish regiment attack the village of Guillemont as part of the middle stages of the battle of Somme. 30 start, Random Draw, 8 games, 30 move on. Games: 6 players, Standard, Manual deployment, Flat rate, fog, chained forts. Maps - Ireland, Celtic Nations
Round 2. German defensive fire pinned down the French 127th Regiment in the ravine. 30 start, Random Draw, 6 games, 24 move on. Games: 6 players, Terminator, Esc, no fog, adjacent forts. Maps - Egypt: Valley Of The Kings, France 1789
Round 3. The 95th Brigade (5th Division) captured its first three objectives. 24 start, Random Draw, 4 games, 16 move on. Games: 8 players, Standard, Flat rate, fog, parachute. Maps - Operation Drug Lord, All Your Base Are Belong To Us
Round 4. The village itself had been destroyed, but underneath it was a maze of German strong points. 16 start, Random Draw, 4 games, 8 move on. Games: 8 players, Terminator, random Flat rate/Esc/Nuke, no fog, chained forts. Maps - Draknor - Level 1, Stalingrad
Round 5. The British had reached their target line, and were ready to turn north. 8 start, Score resets, 9 games. Games: 8 players, Assassin, random Flat rate/Esc, parachute forts. Maps - North America, Northwest Passage, First Nations North America
-- MJ
Progress on this eastern flank of the British line was essential if the French and British were to cooperate properly north of the Somme. By the start of September the capture of Guillemont was becoming more urgent, as the plans for an attack north toward Flers and Courcelette began to take shape.
The successful attack on Guillemont was made by XIV corps, and was led by the 20th Division, with the 5th Division to their right. Their target was Leuze Wood, 1,500 yards beyond the village, on a ridge overlooking the village of Combles.
The southern part of the attack on 3 September suffered the most heavily. There the 13th Brigade had been relying on the French for a final bombardment of their objective, Falfemont Farm, but the French became stuck in Combles Ravine, and were unable to make and progress. The leading waves of the first battalion to attack were wiped out by German fire. To their left the 95th Brigade (5th Division) captured its first three objectives, and reached a line east of Guillemont.
The 20th Division attack on Guillemont began from a series of trenches very close to the German front line. The village itself had been destroyed by repeated artillery bombardments, but underneath it was a maze of German strong points. Despite this the 20th Division attack succeeded, captured its three objectives and reaching the Ginchy-Wedge Wood road, east of Guillemont. Elsewhere British attacks on Ginchy and further west around the front met with little or no success on 3 September.
The advance east of Guillemont continued over the next three days. By the end of 6 September the British had reached their target line, around Leuze Wood, and were ready to turn north to deal with Ginchy. Everything would soon be in place for the next big attack, at Flers-Courcelette.
Above text is from article: Rickard, J (21 September 2007), Battle of Guillemont, 3-6 September 1916, http://www.historyofwar.org/articles/ba ... emont.html
Image is from guernseydonkey.com, showing the 6th Royal Irish regiment, as they were heading back for a rest after taking Guillemont
Battles:
Round 1. The 6th Royal Irish regiment attack the village of Guillemont as part of the middle stages of the battle of Somme. 30 start, Random Draw, 8 games, 30 move on. Games: 6 players, Standard, Manual deployment, Flat rate, fog, chained forts. Maps - Ireland, Celtic Nations
Round 2. German defensive fire pinned down the French 127th Regiment in the ravine. 30 start, Random Draw, 6 games, 24 move on. Games: 6 players, Terminator, Esc, no fog, adjacent forts. Maps - Egypt: Valley Of The Kings, France 1789
Round 3. The 95th Brigade (5th Division) captured its first three objectives. 24 start, Random Draw, 4 games, 16 move on. Games: 8 players, Standard, Flat rate, fog, parachute. Maps - Operation Drug Lord, All Your Base Are Belong To Us
Round 4. The village itself had been destroyed, but underneath it was a maze of German strong points. 16 start, Random Draw, 4 games, 8 move on. Games: 8 players, Terminator, random Flat rate/Esc/Nuke, no fog, chained forts. Maps - Draknor - Level 1, Stalingrad
Round 5. The British had reached their target line, and were ready to turn north. 8 start, Score resets, 9 games. Games: 8 players, Assassin, random Flat rate/Esc, parachute forts. Maps - North America, Northwest Passage, First Nations North America
-- MJ
Delville Wood
-----The Battle of DelvilleWood...July 15th,1916/Story Line...-----
---------Yes, I Wayward Day am still hanging around the Somme battlefield. It is a foggy,misty morning of the 15th of July,1916. As the fighting rages on. The British High Command has decided to begin THE SECOND PHASE in the battle for the Somme. With early success in the battle. H.Q. has decided on an operation to secure the British right flank,at Delvillewood. Now that the battle of Albert offensive. Has led to the capture of fortified villages,woods, and other terrain. Which offered observation for artillery fire, jumping-off points for more attacks, and other tactical advantages against the German 2nd Army of Gen. Fritz von Below.
------General Rawlinson heads towards me. "Major,I need you to take this dispatch to the 158th Artillery Brigade. We are ready for an assault on Delvillewood." "Right away,Sir.",I said. I hopped on a brown horse, who had black feet and a white star on forehead. "Giddy,up!",I yelled. Off we went into the darkness. The misty fog didn't help seeing either. Pieces of cut wire, fox holes, trenches, and for all I know there could be bodies on the ground. Anything could trip us up, and stop us from getting to the 158th. I can't wait to get there either. For my ears have over heard of a very special person there. Being from the future ,I know all about this wonderful, exciting man.
------It is the real life Indiana Jones himself. Lt.Col. Percy Fawcett. Even in 1916 he is a world renowned adventurer. After forty-five minute horse ride. I finally reach the BIG GUNS of the 158th. I jump off my horse at Fawcett's tent. His clerk Cpt. Evans shouts down the way,"If you're looking for the Colonel, he is in the mess tent!" "Thanks!",as I wave to him,heading towards the mess tent he pointed to.
------I see Fawcett at the far end of the mess tent. He is smoking a pipe , as he is eating sausage and beans. As he is going over maps and other papers. I walk up to Col. Fawcett and say,"Here Col., it is a dispatch from Gen. Rawlinson." Fawcett smiles and says,"Thanks Major, You must have had an interesting ride in the dark. Sit down and join me." He points to the cook to bring me something to eat. "I'd love to sir.",I say."Call me Percy,Major.",he said. As he opens the dispatch and reads it. He tells me that the 158th has been ordered to open up a barrage on Delvillewood and the surrounding area. Then the newly arrived 1st infantry brigade,South African is to push forward into Delvillewood.
------We talk for a few hours. Percy tells me of his expeditions to South America. His trips down the Amazon. Indian tribes in Brazil. He speaks of giant spiders. He shot and killed a 60ft snake. But it sank into the quicksand before Percy could reach it. Many think he made it up. But I believe him, because everything else he talked about in his books. Science has proven to exist. Except for the 60ft snake. Teddy Roosevelt offered $1,000 reward to anyone who found a 30/40? snake. This prize still has never been collected. Many believe today's oxygen levels don't allow such a creature. But who knows? He lets on about his friend, Sir Arthur Conan Doyle. After a couple of glasses of brandy. We say Good bye to each other. Percy says,"Major, this Hellish experience at the Somme has convinced me, there must be a better world out there. After this blasted War. I'll spend the rest of my life trying to find it." "Stay safe Col.",I tell him. As I get on my horse and head back to H.Q.. I feel sad inside, knowing Percy and his son will be lost in the Mato Gorosso,The Brazilian, Amazon inn 1925,never to be heard from again.
------As I enter camp ,it is just ahead of the South African 1st Infantry Brigade. They are led by General Henry Lukin. A they pass through on their way to attack the Germans. I am standing near some British regulars. I can hear them talking softly to each other. As they watch the South Africans, they see the large Boer contingent of the 1st South African brigade. They remember the Boer War. They think many of them just fought against us a few years ago. Now we fight side by side against the Germans. I turn towards the regulars and say. Not to mention the South Africans just sailed from Egypt. They had just defeated the Senussi tribe, who were helping and led by General Gaafer Pasha of the Ottoman Empire. The Senussi had been attacking troops in North Africa.
------The goal is to clear the Germans out of Delvillewood and near by areas. To allow British troops safe cover to attack the German "Switch Line". A very key defensive position for the Germans on the Somme. A crash ,flashes of light , it looks like Percy's guns are starting to rain Hell down on the woods. With an order to take the wood "AT ALL COSTS!". Over 3,000 South Africans will soon get their first taste of fighting at the Somme. False reports of the wood had been taken,by Col. Tanner. In fact the German were holding on to the Northwest part of Delvillewood near the town of Longueval
------I spoke with a captured German officer. He said,"Delvillewood had disintergrated into shattered trees ,charred and burning stumps ,craters thick with mud ,blood,and Corpes,Corpes. Everywhere. In places they were pilled four deep.".
------One of the British regulars,Lt. Anderson Spoke out.Hey! I'll tell you something about the fighting at Delvillewood."Great",I said.Anderson speaks,"The South Africans find themselves facing over 7,000 Germans. Artillery shelling from both sides have pushed over trees and exposed their roots. This is making things hard for them to dig trenches. The South Africans are not only up against a larger force, but have to survive in trenches ,with no depth to them. That offer little protection,if any. The surrounding terrain all but dictates that most of the combat. Has been reduced to hand to hand. Fighting with knives ,bombs,and bayonets. Cursing and brutality on both sides, such as the Men can be responsible for when it is the question of (your life or mine),mud and filthy stench. As every part of the trenches seemed filled with dead-sodden ,squelchy,swollen bodies. Fortunately the blackening faces were invisible except when Verey lights lit up the horrible scene. The terrain makes it difficult to move wounded men back to a medical station. Food and water along with ammunition are running low. As we stood or walked on putrefying bodies. We hadn't the faintest idea when or how help could reach us. That is what I'm doing here,for help."
------I tell Anderson "The is no plan at the moment to send anything. Since the attack on Delvillewood began. The Germans have laid down an artillery barrage of their own. On areas of the wood captured by the Allies. It is reported that 400 shells are landing on Delvillewood every minute. Combined with frequent rain, the wood is not only churned up with fallen trees,but it is all has become a quagmire."
-----As Lt. Walks away. More reports are pouring. One catches my eye. It appears the guns of the 158th artillery. , luck has run out. Closer to the enemy lines, than they should be. The 158th has been spotted by enemy planes. Soon after they were attacked by German Artillery. Lt.Col.Percy Fawcett was gassed and baldly wounded ,sent back to a medical unit.I knew this was going to happen. But I couldn't warn Percy. About the German artillery or when he and his son would disappear in the Amazon.
------The skilfully placed German machine gun posts and well hidden snipers greatly hindered any Allied advance through the wood. The South Africans has been relieved. From men of the Royal Welsh Fusiliers,the Royal Berkshire, and the King's Rifle.
-------They tried to take the dog.
-------They faced a heavily fortified enemy that was supported by very accurate artillery fire. They in turn were relieved and replaced by the 14th,17th,and 20th divisions.
German casualties matched Allied casualties but loss of records makes this hard to verify. The South Africans had 3,155 men at the start of the attack on Delvillewood. They suffered 2,536 casualties,4 dead for every 1 wounded man. By the time they were relieved. This represented a loss of 80% killed or wounded and missing. 104 officers out of 123 were killed, wounded or missing,nearly 85%.
-------Four Victoria Crosses were awarded for outstanding bravery:
1)Private William Faulds
2)Sergeant Albert Gill
3)Private Albert Hill
4)Corporal Joseph Davies
------The Victory wet to the British in the end. Delvillewood was cleared of Germans on Sept.3rd,1916. The Germans took it back in March 1918. The Allies would take Delvillewood back for good,for the rest of the War,in Aug.1918.By the 38th Welsh Infantry Division. Being from the future I know the South African government bought the land of Delvillewood inn the 1920's. Delvillewood is well preserved with the remains of trenches ,a museum and a monument to the South African Brigade at the Delvillewood South African National Memorial.
------All I can think of as I look over the landscape. A destroyed wasteland in every direction. Is what the men have come to call it. DEVIL'S WOOD. If ever there was Hell on Earth ,this spot is it. As I wait here, because my satchel is still not glowing. So I'll stay in Hell and wait I guess.
-----1/16.................30 Player Tournament...---
--------Wayward Day's Diary: July 15th,1916...
-----------A British South African led assault on the German held Delvillewood. Opens THE SECOND PHASE of the battle of the Somme. Gen. Henry Lukin hopes to lead his S.A. troops in clearing out the Delvillewood area of Germans. To protect the British right flank. Help give the British Army a better jumping-off point to crush the German 2nd Army of Gen. Fritz von Below. In the end a British Victory. The land left a wasteland. Both sides would continue piecemeal attacks and piecemeal defense on narrow fronts in the Somme area the rest of the War.
Round 1:(Trench Warfare)
30 Players start and 30 move on.Map:Trench Warfare,1-vs-1,3 games:Standard,Auto,Sequential,(Flat Rate,Nuclear,Zombie),(Chained,Adjacent),Fog,Trench,30 Rounds.
Round 2:(Unification Germany,France,England-countries of the Somme battle)
30 Players start and 28 move on.Maps:Unification Germany,France,England,5-6 Player Games,2 on Unification German,2 on France,2 on England:Terminator,Auto,Sequential,(Flat Rate,Nuclear),(Chained,Adjacent),Fog,Trench,30 Rounds.
Round 3:(Classic Cities:London,British Isles,Indian Empire-Places of British Generals)
28 Players start and 24 move on.Maps:C.C.:London,British Isles,Indian Empire,4-7 Player games,2 on C.C.:London,2 of British Isles,2 of Indian Empire:Assassin,Auto,Sequential,(Flat Rate,Nuclear),Chained,Fog,30 Rounds.
Round 4:(Trench Warfare)
24 Players start and 24 move on.Maps:Trench Warfare,1-vs-1,3 games:Standard,Auto,Sequential,(Flat Rate,Nuclear,Zombie),(Chained,Adjacent),Fog,Trench,30 Rounds.
Round 5:(Duck and Cover-Rds 5-7 Honoring Percy Fawcett-Artillery Commander)
24 Players Start and 20 move on.Map:Duck and Cover,3-8 Player games,5 games on Duck and Cover:Terminator,Auto,Sequential,(Flack Rate,Nuclear),Chained,Fog,30 rounds.
Round 6:(Classic Map,World 2.1-Percy a World Adventurer)
20 Players Start and 18 move on.Maps:Classic Map,World 2.1,4-5 player game,2 on Classic Map,2 on World 2.1...:Terminator,Auto,Sequential,Escalating,Chained,Fog,30 rounds
Round 7:(Brazil,South America,First Nations S.Amer.-Lost Expedition)
18 Players start and 16 move on.Maps:Brazil,South America,First Nations South Americans,3-6 Player games,2 on Brazil,2 on South America,2 on First Nations S.Amer.:Assassin,Auto,Sequential,(Escalating,Flat Rate),Chained,Fog,30 Rounds
Round 8:(Trench Warfare)
16 Players start and 16 move on.Maps:Trench Warfare,1-vs-1,3 games:Standard,Auto,Sequential,(Flat Rate,Nuclear,Zombie),(Chained,Adjacent),Fog,Trench,30 Rounds.
Round 9:(Dark Continent,Africa,Africa II--Henry Lukin career in Africa)
16 Players start and 12 move on.Maps:Dark Continent,Africa,Africa II,2-8 player games,2 on Dark Continent,2 on Africa,2 on Africa II:Terminator,Auto,Sequential,Escalating,Chained,Fog,30 Rounds.
Round 10:(Trench Warfare)
12 Players start and 12 move on.Map:Trench Warfare,1-vs-1,3 games:Standard,Auto,Sequential,(Flat Rate,Nuclear,Zombie),(Chained,Adjacent),Fog,Trench,30 Rounds.
Round 11:(Egypt:Lower,WWI Ottaman Empire--South Africans go Egypt to the Somme)
12 Players start and 8 move on.Maps:Egypt:Lower,WWI Ottaman Empire,3-4 Player games,2 on Egypt:Lower,2 on WWI Ottaman Empire:Terminator,Auto,Sequential,(Flat Rate,Nuclear),Chained,Fog,30 Rounds.
Round 12:(Trench Warfare)
8 Players Start and 8 move on.Map:Trench Warfare,1-vs-1,3 games:Standard,Auto,Sequential,(Flat Rate,Nuclear,Zombie),(Chained,Adjacent),Fog,Trench,30 Round.
Round 13:(South Africa 1885,Germany--S.A. troops attack German held Delvillewood)
8 Players start and 6 move on.Maps:South Africa 1885,Germany,1-8 Player game,3 on South Africa 1885,3 on Germany:Terminator,Auto,Sequential,(Nuclear,Zombie),Adjacent,Fog,Trench,30 Rounds.
Round 14:(4-Star Meats--South Africans cut down by machine guns)
6 Players Start and 4 move on.Map:4-Star Meats,1-6 Player game,3 on 4-Star Meats:Assassin,Auto,Sequential,(Nuclear,Zombie),Chained,Fog,Trench,30 Rounds.
Round 15:(Scotland,Celtic Nations--Relief Force)
4 Players start and 2 move on.Maps:Scotland,Celtic Nations,1-4 Player game,2 on Scotland,2 on Celtic Nations:Assassin,Auto,Sequential,(Flat Rate,Nuclear,Zombie),(Chained,Adjacent),Fog,Trench,30 Rounds.
Round 16:(Wales-Relief force,would later win Delvillewood for Good in WWI)
2 Start,Map:Wales,1-vs-1,9 games:Standard,Auto,Sequential,(Flat Rate,Nuclear,Zombie),(Chained,Adjacent),Fog,Trench,30 Rounds.
-- CSS
pozieres
------The Battle of Pozieres...July 23rd,1916/Story Line...-----
----------Well,Wayward Day here. Yes you quest it. I still find myself stuck on the Somme. The battleroom is a mess this morning. As I look own at the battle map of the Somme. I can see that the German 2nd Army under Gen. Fritz von Below has had a part split off. It has formed the German 1st Army of Gen. Max von Boehn. Across the German lines ,Haig's 4th Army is joined by the British Reserve Army of Lt.Gen.Hubert Gough. Who has been holding the line north of the road since July 1st. Three Australian divisions of the I Anzac Corps has been sent to join Gough's forces. The High Command has decided to attack the village of Pozieres on the Albert-Bapaume road. Pozieres is the most important German defensive position. The German second line,runs to Mouquet Farm in north,runs behind Pozieres to the east,then south towards Bazentin Ridge and Longueval. This part had been captured by Gen. Rawlinson. With the chance to turn north right away and pressure Pozieres.
------But Gen. Haig decided with the lack of ammunition to immediately execute another large scale attack after July 14th. Haig thought the Germans couldn't reach Pozieres and Thiepval with help. Because of the British eastward troop movement. Haig then ordered Rawlinson to concentrate his forces between the Highwood and DelvilleWood. The plan was to take Pozieres by a slow step-by-step advance. The 4th Army did try 4 times early on to take Pozieres. But were driven back with high casualties. They now on the morning of July 23rd,1916 have gotten prepared for a massive attack on Pozieres. The attack had been planned for the 18th of July,with Rawlinson leading the attack. But Haig transferred the sources to attack Pozieres led by the Reserve Army of Gen. Hubert Gough. As the Generals talk in the battleroom. Gen. Gough,who is known as a "thruster", turns towards Gen. Harold Walker,"I want you to smash and capture Pozieres!",yelled Gough. Walker said,"I will only attack after adequate preparation has been made."
------They begin to move the little wooden army figures on the battle map. The Australian 1st Division is to attack Pozieres from the south. As they in 3 stages,half an hour apart. While north of the Albert-Bapaume road. Gough's British regulars will attack the German trenches west of Pozieres. The German lines have been bombarded the past 7 days with shells, that include phosgene and tear gas. As soon as the shelling stops. The infantry that has crept close to the Germans in No Man's Land. Will jump up and rush the German trenches. Reports were coming in fast. As the Second Stage got underway. The Australians advanced to the edge of the village. Past the remains of back gardens of the houses lining the Albert-Bapaume road. The 3rd Stage brought the line to the road. The few Germans left in the garrison retreated to the northern edge of the village, or into the German Lines to the east. The Australians intended to capture the German Lines as far as the road,but failed. Strong resistance from German defenders in deep dugouts and machine gun nests. Also the confusion of a night attack on featureless terrain. The weeks of shelling had smashed the ridge to a field of craters. Which made it hard to tell where the trench line ran.
------The failure to take the O.G. Lines as they were called. Made the eastern end of Pozieres vulnerable. So the Australians formed flanks short of their goal. On the western edge of the village, the Australians captured the German bunker known as "Gibraltar". Reserve Australian troops moved up to secure the rest of the village. The attack of the British regulars on German trenches west of Pozieres achieved some success. But the main attack of the 4th Army near Pozieres was a costly failure. The battlemap and reports showed Success on the Somme. But it brought the death of Victory. Which surpassed the death of failure. For the Australians, Pozieres was such a case. One Aussie wrote,"Pozieres ridge is more densely sown with Australian sacrifice than any other place on Earth."
------With Pozieres being the only British gain on the 23rd of July. Pozieres became the German Army's main focus of atttention. Because it formed the critical point of their defense system. Gen.Below ordered it be retaken at all costs. 3 German attempts were made on the 23rd of July. But British artillery and machine gun fire drove them back. Communication was hard to keep up with on both sides. It wasn't even until the 24th of July that the Germans realized the British had captured all of Pozieres.
------The British were slowing down all over the front. This allowed the Germans opposite Pozieres to use most of their artillery. To rain down fire and hell down on the village and it's approaches. The western approach to Pozieres, from Casualty Corner to Sausage Valley,was hit by shell fire so hard. It would be recalled "Dead Man's Road". The British prepared for a German counter attack. Instead of a German counter attack. The Germans decided to use the men to build up defense on the O.G.Lines. The 2 sides thinking the other was getting ready to attack. Called for their artillery to keep pounding the other side. When the Australians were finally relieved. They looked like men who had been in hell. Drawn and haggard and so dazed that they appeared to be walking in a dream. Their eyes looked glassy and starey.
------As the reports of the fight keep pouring in to the battleroom. The room has the Generals at each other's throats. Meanwhile on the front lines. The British 1st Division has tried to take the intersection of the German O.G. and Switch Lines. Known to the British as Muster Alley. Each side started throwing hand grenades at each other. The British and Australians alone threw 15,000 grenades. As the attack along the line progressed. They men encountered uncut barbwire, the heavy German bombardment earlier made it hard with raised dust. Not allowing the Australian artillery observers to aim their guns and see the barbwire entanglements. Some minor progress by the Infantry was made. But the attack had become a failure. The division suffered such losses. It was pulled of the line to serve as a reserve unit. Gen. Haig blamed ,Gen. Birdwood for the failure of his men. He shouted ,"You're not fighting Bashi-Bazouks now!" Birdwood lowered his head in shame. Gen. Gordon Legge of the I Anzac Corps has a plan. His men will attack the crest of the ridge,near the old windmill mound of Pozieres. They will go at dusk. As the men assemble in the day. They have to move and get ready in the trenches. More needed to be dug. As the men tried to dig new trenches. The Germans thought they were attacking. The Germans called down barrage shelling on the digging parties. As both sides continued to shell each other.
------Gen. Legge's men made it to and captured the O.G.Lines. When the Australians got to the O.G.Lines. They were totally obliterated by prolonged shelling. The Australians advanced beyond their objectives. The men from their spot in the O.G.Lines on the Pozieres ridge,could look out over the green unshelled countryside. To the village of Courcelette and he woods of Bapaume 5 miles away. The German Gen. Max von Boehn ordered Hill 160(the windmill mound) of Pozieres ridge be retaken at any price.
------As I left the battleroom,tired of listing to all the bickering of the High Command. I head down the camp. I come across a wounded man laying on the ground,in a stretcher. "Who might you be.",I asked. "I'm Lt. Albert Jacka of the 4th Australian Division.",he said. As I see his bloodied body and torn uniform. "Wow,is that a Victoria Cross!",I yelled with amazement. He says,"Yes,I earned it at Gallipoli." He goes on to tell of the German counter-attack on the windmill mound. "Well Major it all started when we walked into the German O.G.Lines unopposed. We felt like we could see all the back to Australia. Then all of a sudden a few Germans charged our position. They dug in after we stopped the charge with machine gun fire. Next all hell broke lose. The sky opened up with fire. For our position was shelled from all four directions. Including the German stronghold Thiepval ,which lies to our rear. The shelling was slowing down the 4th Australian Division, as we were relieving the 2nd Australian Division. The Germans stopped shelling then opened up a counter-attack on a 400 yard front. They over ran the thinly occupied O.G.Lines. Trapping most of our Australian infantry in shelters of the old German dugouts,as they advanced towards Pozieres. 7 men of my platoon and I, jumped out of our isolated dugout. Charged the Germans from the rear. Other Australians scattered across the plateau joined the action. Soon a fierce hand-to-hand blood bath was underway. A grenade blew me off my feet. Shrapnel ripped through me all over. I past out, and only woke up just a short time ago.",he said in pain.
------"Well you and your men did it Lt.,your Australian division with your act of courage. Gained the advantage, most of the surviving Germans were captured. No more attempts to retake Pozieres have been made. They have pulled back. We have won the Pozieres sector.Lt. We have won!",I shouted happily.
------As I shake the Lt.'s hand,we say good bye and good luck to each other. I hear,"Come on Major!",Gen. Haig shouted. He says,"We are on our way to meet the returning men from Pozieres." As I look over the reports of the high cost the Allies paid to acquire Pozieres. I see the 5,400 British casualties and the 23,000 Australian casualties. Lt. Jacka let me know when we talked. That aside from the bad mistakes of the High Command. Many losses were due to Australian inexperience and their "reckless daring".
------As I think of that, Gen. Haig informs the men of 3 such reckless daredevils.
1)Pvt. John leak 9th Battalion,3rd Brigade,1st Australian Division
2)Lt. Arthur Blackburn 10th Battalion,3rd Brigade,1st Australian Division
3)Sgt. Claud Castleton 5th Machine Gun Company,5th Brigade,2nd Australian Division
------I leave camp ,head in the direction of the old windmill mound. As I stand on the spot of the 17th century windmill. I look through my field glasses at the untouched landscape ahead. My satchel starts to glow...A flash,dizziness, off I go...But Where???
------The Battle of Pozieres/Tournament...------
------1/7..............................16 Player Tournament...------
--------------Wayward Day's Diary:July 23rd,1916......
--------The Battle of Pozieres began with the capture of Pozieres by the Anzac or Australian Imperial Force, of the Reserve Army. The only British success in the Allied fiasco, of July 23rd. When a general attack , along with French troops further south. Broke down into separate attacks due to communication failures and poor weather. German bombardments and counter-attacks began on the 23rd of July and lasted until August 7th. The fighting ended when the Anzac Corps Reserve Army took the plateau north and east of Pozieres from the Germans. It over looked the German stronghold of Thiepval to the rear. A costly British Victory.
Round 1:(Trench Warfare)
16 players start and 16 move on.Map:Trench Warfare,2-8 player games,2 on Trench Warfare:Assassin,Auto,Sequential,(Flat Rate,Nuclear),Adjacent,Fog,Trench,20 rounds.
Round 2:(England-A lot of the Generals born in England)
16 players start and 8 move on.Map:England,2-8 player games,2 on England:Assassin,Auto,Sequential,(Flat Rate,Nuclear),Adjacent,Fog,Trench,20 rounds.
Round 3:(British Isles,Germany-2 Empires duel on the Somme)
8 players start and 8 move on.Maps:British Isles,Germany,1-8 player game,1 on British Isle,1 on Germany:Assassin,Auto,Sequential,(Flat Rate,Nuclear),Adjacent,Fog,Trench,20 rounds.
Round 4:(France)
8 players start and 4 move on.Map:France,2-4 players games,2 on France:Assassin,Auto,Sequential,(Flat Rate,Nuclear),(Chained,Adjacent),Fog,Trench,20 rounds.
Round 5:(Unification Germany-German troops regroup for a counter-attack)
4 players start and 4 move on.Map:Unification Germany,1-4 player game,2 on Unification Germany:Terminator,Auto,Sequential,Escalating,Chained,Fog,20 rounds.
Round 6:(WWI Gallipoli-many Anzac troops came from Gallipoli)
4 players start and 2 move on.Map:WWI Gallipoli,1-4 player game,2 on WWI Gallipoli: Terminator,Auto,Sequential,(Flat Rate,Nuclear),Chained,Fog,Trench,20 rounds.
Round 7:(Australia-The Australians Win Pozieres for the Allies)
2 players start,Map:Australia,1-vs-1,1 game on Australia:Standard,Manual,Sequential,Nuclear,Adjacent,Fog,Trench,20 rounds.
-- CSS
sixth Isonzo
-------The 6th Battle of Isonzo/ Story Line-------
-----------August 6th,1916------------
------------A hear my name yelled,"Wayward Day,Major!". It wakes me up,more then that it is yelled in German. I look around and see, not only that I'm in an Aus/Hun uniform. At Aus/Hun General Svetozar Boroevic's headquarters, in the Aus/Hun Empire's Slovene territory. I see the date on the tear away calendar on the back wall of the battleroom. August 6th,1916,it looks like I get relive "Gorizia",the 6th battle of Isonzo all over. As I see what the Central Powers are up to. Ever since the Aus/Hun High Command launched the Strafexpedition offensive. Things have been falling apart for the Empire. As they try and fight a war on 2 fronts.
------The Aus/Hun Army pulled troops of the Isonzo valley sector. To not only take part in their offensive in Trentino. But they had to send troops to the East. To try and stop the Russian Brusilov offensive in Bukovina. They felt confident to move troops. Because of the terrain of the Isonzo valley,and the trench lines. I walk over to see what Gen. Boroevic needs. He asks me to give him reports of the defense of Gorizia. I hand him a stack of papers and photos. As he looks things over, he begins to fill in everyone in the battleroom, the High Command's plan. After Aus/Hun offensive failed in the Spring. With the Russians attacking the eastern frontier. An Italian attack seemed near at the Isonzo. They have already tried 5 times. They know the Aus/Hun Army is being thinned out all over. So a 6th attack makes sense.
------The General barely started speaking, when a messenger rushed in with news. "The Italians are attacking at the Isonzo river again!",he yelled. As the General turned and looked his way. The General's face saddened, he looked like he had been punched in the stomach. As the hours and days pass in the battleroom. Things and events would stabilize the front lines at the Isonzo region. Even though the Aus/Hun Army was fighting a war on 2 fronts,with little resources. I would watch Gen. Boroevic move the troops around on the battle map. He was able to slow the Russians down in the East. He was also able to plug up the holes in the defense at Isonzo. Although they had been beaten out of the city of Gorizia, a piece of the Aus/Hun Empire. The 1st bit of actual Aus/Hun territory taken by Italy in World War I. For the Aus/Hun Army, the loss of Gorizia represented merely a symbolic defeat, and pushed back the front lines. But did not destroy the defensive system of the Aus/Hun Army in the Isonzo area.
------The Aus/Hun High Command was more interested in the East. The threat of the Brusilov offensive in Bukovina. Due to the fact that at Isonzo, the Italians had more men. But they were under equipped, could not match the Superior fire power of the Aus/Hun Army's heavy guns. The Italian armies would just melt away in front of massive Aus/Hun bombardments. Yet Italian General Cadorna would keep up his attacks time and again. He used the 6th battle of Isonzo, and the success of Gorizia. To justify his tactics. All in all ,a costly victory for the Italians. As I leave the battleroom, head towards my tent. My satchel starts to glow. As I make it to tent , I lay down on my cot. Everything goes dark...I fall asleep...
-----The 6th Battle of Isonzo/ Tournament-----
----1/7....................................16 Player Tournament-----
--------Wayward Day's Diary:August 6th,1916-------
----------The Aus/Hun High Command reduced their forces along the Isonzo front to reinforce their Trentino offensive. Italian Gen. Cadorna used railroads to move troops from Trentino to the Isonzo valley line. For an offensive against the weakened Aus/Hun defenses. The Italians captured the city of Gorizia. It didn't matter much to the Aus/Hun Army's defense. For Cadorna and the Italians it was Italy's 1st major victory in The First World War. Italy would soon after declare war on Germany. But in reality, the Itatians could go no further than Gorizia. Suffered huge losses. It was a Pyrrhic victory. But a huge boost in moral back home in Italy.
Round 1:(Italy,Austro-Hungarian Empire-2 Empires fight on the Isonzo)
16 players start and 16 move on.Maps:Italy,Austro-Hungarian Empire,4-4 player games,3 on Italy,3 on Austro-Hungarian Empire:Standard,Auto,Sequential,(Escalating,Flat Rate,Nuclear),(Chained,Adjacent),Fog,Trench,30 rounds.
Round 2:(Yugoslavia-Gen. Boroevic born in modern day Croatia)
16 player start and 8 move on.Map:Yugoslavia,2-8 player games,7 games on Yugoslavia:Terminator,Auto,Sequential,(Escalating,Flat Rate),Chained,Fog,30 rounds.
Round 3:(Rail Europe-Italians used the rails to move men around to new fronts)
8 players start and 8 move on.Map:Rail Europe,2-4 player games,7 games on Rail Europe:Terminator,Auto,Sequential,Escalating,Chained,Fog,30 rounds.
Round 4:(Magyarorszag,Balkan Peninsula-Italy's 1st victory on Aus/Hun soil)
8 players start and 6 move on.Maps:Magyarorszag,Balkan Peninsula,1-8 player game,3 on Magyarorszag,Balkan Peninsula:Assassin,Auto,Squentail,(Flat Rate,Nuclear),Chained,Fog,30 rounds.
Round 5:(Czecho-Slovak Fragmentation,Slovakia-Aus/Huns retreat to Slovene territory)
6 players start and 4 move on.Maps:Czecho-Slovak Fragmentation,Slovakia,1-6 player game,3 on Czecho-Slovak Fragmentation,3 Slovakia:Terminator,Auto,Sequentail,Escalating,Chained,Fog, Trench,30 rounds
Round 6:(Unification Italy,Unification Germany-Italy declares war on Germany)
4 players start and 2 move on.Maps:Unification Italy,Unification Germany,1-4 player game,3 on Unification Italy,3 on Unification Germany:Assassin,Auto,Sequential,(Escalating,Flat Rate),Chained,Fog,30 rounds.
Round 7:(Trench Warfare-Aus/Hun Trenches stop any further Italian advance)
2 players start.Map:Trench Warfare,1-vs-1,9 games on Trench Warfare,Standard,Auto,Sequential,(Escalating,Flat Rate,Nuclear),(Chained,Adjacent),Fog,Trench,30 rounds.
-- CSS
flers-courcelette
The Battle of Flers-Courcelette - 15-22 September 1916
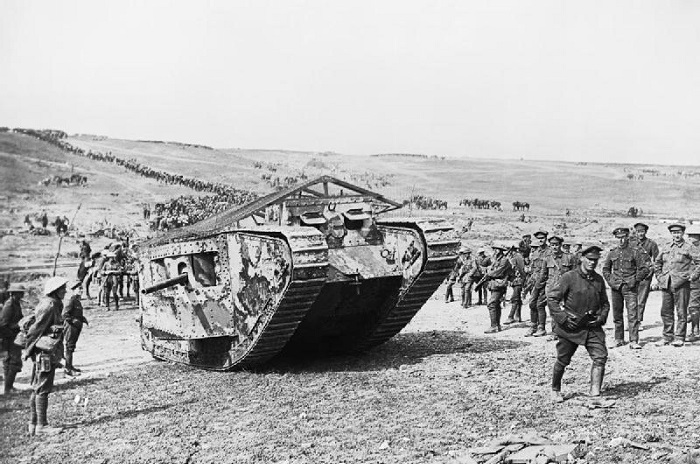
The Battle of Flers-Courcelette was a large, long planned battle that ended up using two new tactical innovations - A creeping artillery barrage, and for the first time in history, tanks.
The creeping barrage, instead of trying to annihilate the enemy, was a slow raking forward of thousands of shells, advancing 100 yards at a time. It was not meant to destroy the trenches, but to drive the enemy into them. Then the infantry would closely follow the barrage, in order to get into No Man's Land before the enemy could emerge from the trenches and fire at them.
The infantry was also accompanied by the tanks, also known as Land Sharks. The battle was to include 49 tanks, but most never made it into battle for various different reasons. In the end, only 15 of the tanks made it into No Man's Land. At 28 tons, the Mark 1 tanks could only move forward at a half mile per hour, at the walking pace of the infantry.
With this new artillery barrage and tanks, a carefully prepared infantry attack of Canadians captured the ruined village of Courcelette on the 15th of September. Likewise, the XV corps, including the New Zealand Divisions, succeeded in their objective of capturing Flers.
The attack continued into the 16th of September, but heavy loses, poor progress and bad weather bogged the advance down. Rain fell over the next days, restricting activity on both sides. The Germans reinforced the trenches east of Courcelette with fresh troops, and further attacks on the 17th to the 19th also failed.
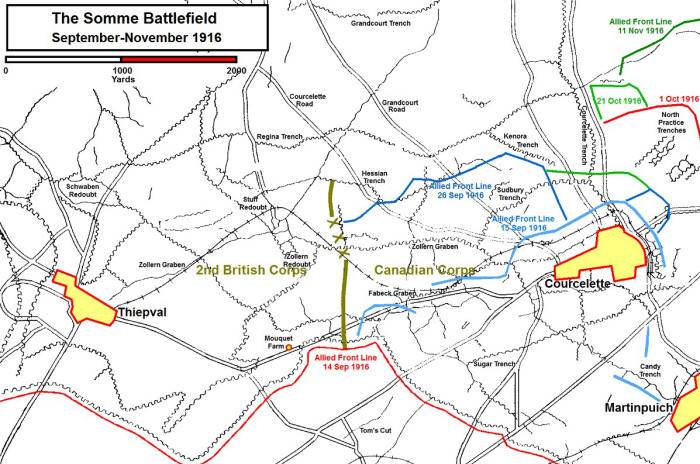
In a dawn raid on the 20th of September, two battalions were able to secure a hold in the Zollern Graben but were quickly counter-attacked by German troops using a smoke screen. After a long morning battle, the Germans were able to regain most of what they had lost. Eventually the allied troops managed to advance east of Courcelette, and capturing front-line German trench postions on the 22nd of September.
The use of tanks at Flers-Courcelette was considered controversial at the time, but did lead to advancements that brought breakthroughs in battles in the following year. In the end of the battle, while the Germans had been dealt a severe blow, the attacks fell far short of the desired goals.
Maps:
France, France 2.1 - The Battle Ground
Trench - The Creeping Barrage with Infantry
England, British Isles - The makers of the Land Shark
Canada, New Zealand - The capture of Flers and Courcelette
France 1789, Germany, plus previous maps - Germans make gains then falter
Game Play:
Round 1. The Battle Ground. 28 start, Random Draw, 6 games, 28 move on. Games: 2 point per game, 7 players, Terminator/Assassin, Flat rate/Esc, fog, chained forts. Maps - France, France 2.1
Round 2. The Creeping Barrage with Infantry. 28 start, Random Draw, 4 games, 24 move on. Games: 3 point per game, 7 players, Terminator/Assassin, Flat rate/Esc/Nuke, no fog, trench, adjacent forts. Maps - Trench
Round 3. The makers of the Land Shark. 24 start, Random Draw, 8 games, 14 move on. Games: 1 point per game, 2 players, Standard, Flat rate/Esc/No Spoils, fog/no fog, adjacent/chained/parachute forts. Maps - England, British Isles
Round 4. The capture of Flers and Courcelette. 14 start, Random Draw, 7 games, 7 move on. Games: 1 point per game, 7 players, Standard, Esc, no fog, chained forts. Maps - Canada, New Zealand
Round 5. Germans make gains then falter. 7 start, Score Resets, Random Draw, 9 games. Games: 1 point per game, 7 players, Standard, Flat rate/Esc/No Spoils, fog/no fog, chained/parachute forts. Maps - France 1789, Germany, France, France 2.1, England, British Isles, Canada, New Zealand, Trench
-- MJ
The Battle of Flers-Courcelette was a large, long planned battle that ended up using two new tactical innovations - A creeping artillery barrage, and for the first time in history, tanks.
The creeping barrage, instead of trying to annihilate the enemy, was a slow raking forward of thousands of shells, advancing 100 yards at a time. It was not meant to destroy the trenches, but to drive the enemy into them. Then the infantry would closely follow the barrage, in order to get into No Man's Land before the enemy could emerge from the trenches and fire at them.
The infantry was also accompanied by the tanks, also known as Land Sharks. The battle was to include 49 tanks, but most never made it into battle for various different reasons. In the end, only 15 of the tanks made it into No Man's Land. At 28 tons, the Mark 1 tanks could only move forward at a half mile per hour, at the walking pace of the infantry.
With this new artillery barrage and tanks, a carefully prepared infantry attack of Canadians captured the ruined village of Courcelette on the 15th of September. Likewise, the XV corps, including the New Zealand Divisions, succeeded in their objective of capturing Flers.
The attack continued into the 16th of September, but heavy loses, poor progress and bad weather bogged the advance down. Rain fell over the next days, restricting activity on both sides. The Germans reinforced the trenches east of Courcelette with fresh troops, and further attacks on the 17th to the 19th also failed.
In a dawn raid on the 20th of September, two battalions were able to secure a hold in the Zollern Graben but were quickly counter-attacked by German troops using a smoke screen. After a long morning battle, the Germans were able to regain most of what they had lost. Eventually the allied troops managed to advance east of Courcelette, and capturing front-line German trench postions on the 22nd of September.
The use of tanks at Flers-Courcelette was considered controversial at the time, but did lead to advancements that brought breakthroughs in battles in the following year. In the end of the battle, while the Germans had been dealt a severe blow, the attacks fell far short of the desired goals.
Maps:
France, France 2.1 - The Battle Ground
Trench - The Creeping Barrage with Infantry
England, British Isles - The makers of the Land Shark
Canada, New Zealand - The capture of Flers and Courcelette
France 1789, Germany, plus previous maps - Germans make gains then falter
Game Play:
Round 1. The Battle Ground. 28 start, Random Draw, 6 games, 28 move on. Games: 2 point per game, 7 players, Terminator/Assassin, Flat rate/Esc, fog, chained forts. Maps - France, France 2.1
Round 2. The Creeping Barrage with Infantry. 28 start, Random Draw, 4 games, 24 move on. Games: 3 point per game, 7 players, Terminator/Assassin, Flat rate/Esc/Nuke, no fog, trench, adjacent forts. Maps - Trench
Round 3. The makers of the Land Shark. 24 start, Random Draw, 8 games, 14 move on. Games: 1 point per game, 2 players, Standard, Flat rate/Esc/No Spoils, fog/no fog, adjacent/chained/parachute forts. Maps - England, British Isles
Round 4. The capture of Flers and Courcelette. 14 start, Random Draw, 7 games, 7 move on. Games: 1 point per game, 7 players, Standard, Esc, no fog, chained forts. Maps - Canada, New Zealand
Round 5. Germans make gains then falter. 7 start, Score Resets, Random Draw, 9 games. Games: 1 point per game, 7 players, Standard, Flat rate/Esc/No Spoils, fog/no fog, chained/parachute forts. Maps - France 1789, Germany, France, France 2.1, England, British Isles, Canada, New Zealand, Trench
-- MJ
back to main index
“Life is a shipwreck, but we must not forget to sing in the lifeboats.”
― Voltaire
― Voltaire
Re: The Great War
Eight Isonzo coded and launching (today I hope.)
Ninth Isonzo coming soon.
(Thanks Joe, for both of those!)
Okay:
outstanding battles of 1916
Montenegro Jan 5th posted by DK
Mojkovac Jan 6th
Koprukoy Jan 10th
Fromelles July 19th
Maghdaba, December 14th
Second Kut, Dec. 15th
Opening 1917
the small but exciting Battle of Khadairi Bend, January 9th, 1917
Battle of Nahr-al-Kalek, February 26th, 1917
Fall of Baghdad, March 11th, 1917
Samarrah, March 13th
Fallujah, March 19th
Jebel Hamrin, March 25
First Gaza, March 26h
Vimy Ridge April 9th
Battle of Shiala April 11th
Second Battle of the Aisne April 16th
Second Gaza April 17th
Istabulat April 21st
Doiran April 22nd
Battle of the Boot April 30th
10th Isonzo May 12th
Otranto Straits May 14th
Battle of Messines
Third Ypres July 31st
Passchendaele July 31st
11th Isonzo August 19th
Ramadi 28 Sept
12th Isonzo (Caporetto) Oct 24th
Third Battle of Gaza (Beersheba)31st October
Capture of Tikrit November 5th
Battle of Mughar Ridge November 13th
Cambrai November 20th
Fall of Jerusalem Dec. 8th
Start of 1918
Raid on Zeebrugge April 23rd, 1918
Third Battle of the Aisne May 27th
Battle of Cantigny May 28
Chateau-Thierry June 3rd
Belleau Wood June th
Battle of the Piave River June 15
Le Hamel July 4th
Second Battle of the Marne July 15
Battle of Havrincourt Sep 12th
Battle of Epehy Sep 18th
Vittorio Veneto October 23
Battle of Sharqat October 29
The Armstice November 11th 1918
Now, the above is not a complete list. I've copied it mainly from firstworldwar dot com, which is a very Anglocentric site and doesn't do a very good job of covering the Russian and Balkan fronts. I'll have to go to some other sites to fill in some of the missing Russian and Balkan battles. We also have gigi_b's Romanian campaign, plus I was going to write some tourneys based on technologies (like the tank and the submarine). We also somewhere along the way missed the conclusion of the Kamerun campaing and a few other things. So, all in all, we have something between 50 and 60 tournaments to go.
“Life is a shipwreck, but we must not forget to sing in the lifeboats.”
― Voltaire
― Voltaire
-
ConfederateSS

- Posts: 4057
- Joined: Wed Dec 31, 2008 1:50 pm
- Location: THE CONFEDERATE STATES of AMERICA and THE OLD WEST!
Re: The Great War
----Lucky Wayward Day is a time traveler...He is typing THE BATTLE OF ROMANI...as we speak...  ConfederateSS.out!(The Blue and Silver Rebellion)...
-
ConfederateSS
- Posts: 4057
- Joined: Wed Dec 31, 2008 1:50 pm
- Location: THE CONFEDERATE STATES of AMERICA and THE OLD WEST!
Re: The Great War
------------The Battle of Romani----Story line....
-----------------August 3,1916----------
------------I Wayward Day find myself lying down, but I feel something like sand paper across my face. As I jump to my feet. I am smack dab in the middle of a sand storm. As the wind dies down. All I can see for miles is sand. It feels like 150 degrees F ,but I'll take it. It seemed like I was never getting out of the cold,wet,muddy trenches of the Western Front in France.
-------Here I am listening to words in the wind. They are in German. As I look at my uniform, it is also German. I walk towards a grouping of tents. It is Gen. Friedrich Freiherr Kress von Kressenstein head of troops in the desert. All 3 Central Powers have made a plan. The last great attack in the desert by The Central Powers. They hope to not take the Suez Canal. But take cities on the banks of the Suez Canal. So they can attack allied shipping from land. Halt supplies getting through to the Allies.
-------The plan is to take the city of Romani on the Sinai Peninsula. It is the site of the ancient city of Pelusium. Any ancient army trying to conquer Egypt in biblical times, had to take Pelusium first. For it was known as "The Gateway to EGYPT". The Assyrians tried to take Pelusium. When the Egyptian army refused to help the leader of Pelusium. He prayed to the Gods. Later that night field mice ate the weapons of the Assyrians. They fled the area the next day. The Persians 200 years later took Pelusium. When they had cats ,who the Egyptians worshiped led their army. The Egyptians refused to attack the cats and surrendered to the Persians.
-------With troops sent by all 3 members of the Central Powers, we set out from Katia to attack Romani. It is the morning of August 3, 1916. I head out with an advance scouting party. To see a way past a group of massive sand dunes. We are attacked by a British cavalry patrol. As a sand storm picks up. as the fighting goes on. I get lost ,as all I can see in every direction is sand. When the storm settles down. No one can be seen. I see a sparkle of light in the distance. As I walk towards it. I see it is a downed plane, a British one. As I go over the wreckage , I find the pilot , who looked like he died when his plane crashed. No outer wounds on his body.
-------I make a choice right then and there. Being from the future. Knowing the outcome of The First World War. I switch uniforms with the British pilot. a few hours later. I am spotted by an Australian Light Horse Brigade. As they pick me up. I tell them I was shot down and have been wandering the desert four days. The commander of the brigade tells me I am now riding with them. They are trying to stop a major enemy offensive. They have no time to take me back to the nearest airfield. I tell them that I would be happy to fight with them for the time being.
-------Up until this time. The were defending a water pipeline and railway being built. That would move water and troops closer to Romani. Knowing that water was the most valuable item in this battle for the Suez. Along with this Aussie Light Horse Brigade. Was a group of British cavalry reserves known as Yeomanry. Who I soon became a part of. As the day wore on. The Armies of The Central Powers were closing in on Romani. The sky would soon be filled with flashes of light and moving objects. The Central Powers had control of the air. But these objects were shells.
-------The infantry defenses and camps in the rear, had some losses do to shrapnel. But lucky the high explosive shells were smothered by the soft sand. Not to mention the Allied Commander-in-Chief General Sir Archibald Murray's headquarters. Was not hit by the shelling. With British, Australian and New Zealand. Murray was hoping to hold off an enemy attack and launch a counter strike offensive of his own.
-------At the on set of the battle the battle, the cavalry of both armies would clash. As both sides try to race to key positions on the battlefield. As the foot soldiers of both sides ready for the fight. 3 columns of Central Powers' infantry charge head on to the defensive line of Murray surrounding Romani. The British infantry are forced off of Wellington Ridge. as the 1st and 2nd Light Horse Brigades helped to withdraw the British infantry off the ridge. As darkness falls the sounds of battle fall quite. As both sides rest for the next day of fighting.
-------As the 2nd day of fighting got underway. The Central Powers' center and left columns found their way around an open flank of the British infantry, and on towards the British main camps and railway. The Germans and Ottomans made a bayonet charge on Mount Meredith. Which they soon captured and put machine guns on. Pouring lead down on the fleeing British troops. Meanwhile The Central Powers were being held south of Romani. They tried to out flank the British forces to the west.
-------The Central Powers' right column was attempting a frontal attack on the defenses of Romani. While their air forces and artillery severely bomb the city of Romani itself. The troops of the Central Powers soon captured Mount Royston near Mount Meredith. But due to along night's march before the day's fighting began. The Central Powers' troops , even with success. Faced a day under the desert sun without being able to resupply with water. Being fired upon by Romani's artillery. Soon by the 2nd day's end. The troops of the Central Powers found themselves at a standstill everywhere. Meanwhile the British were able to pull 50,000 troops together,from around the region to Romani.
-------As the 3rd day of fighting began. The Central powers had advanced far beyond the main British infantry's positions. With their left flank exposed to the British. But the Central Powers are almost about to smash the main railway leading to Romani.
-------Our horse brigade is now attacking Mt.Meredith, Mt.Royston and Wellington Ridge. Along with New Zealand and Scottish rifle brigades. After a few hours of bloody fighting. we pushed the troops of the Central Powers back off our objectives. Recaptured all 3 main targets held by the enemy machine gunners.
-------Von Kressenstein's troops were starting to fall back. Had the British infantry left their trenches earlier and attacked east. It would have made it difficult for any of the troops of the Central Powers to escape. We began to chase the Central Powers back to Katia. We were supplied with water for our offensive, by the Egyptian Camel Transport Corps. We did not reach Abu Hamra until late in the evening. Giving Von Kressenstein time to move his troops and his heavy guns out of the area during the day. As we captured Katia , we realized what we were up against.
-------Von Kressenstein had prepared lines of defenses as he advanced on Romani. The enemy has enabled himself to fight a masterly rearguard action. Our Yeomanry brigade captured the Oasis of Oghratina. Gen. Murray's troops move and capture Bir el Abd. Meanwhile Central Power troops from El Arish allowed Von Kressenstein to launch a counter strike. Halting the British. As the fighting stops. In a victory for the British Empire. Their 1st victory against the Ottoman Empire. Also a moral boost, as everywhere from France to the eastern front to Kut, the Allies had been taking one beating after another. The victory was welcome news.
-------As I make my way back to Romani. I can't help but think that Von Kressenstein succeeded in withdrawing his battered force from Capture. Both his advance to Romani and withdrawal. Were remarkable achievements of planning , leadership, staff work and endurance. A cloud of sand over takes the truck I'm in. My satchel starts to glow, as sand slams into my face. Darkness ...Where to now?
-
ConfederateSS
- Posts: 4057
- Joined: Wed Dec 31, 2008 1:50 pm
- Location: THE CONFEDERATE STATES of AMERICA and THE OLD WEST!
Re: The Great War
---------The Battle of Romani/Tournament---------
-----1/5...................16 Player Tournament--------
------------Wayward Day's Diary:August 3,1916------
----------------The Battle of Romani was the last ground attack by the Central Powers on the Suez Canal. It was fought near the Egyptian town of Romani. The site of ancient Pelusium on the Sinai Peninsula. The Gateway to Egypt from the east. The Central Powers led by Gen. Von Kressenstein against the British Empire led by Gen. Murray. It ended in a British victory. Although as the British waited to attack at the key point in the battle. Von Kressenstein was allowed to pull off an amazing rearguard escape.
Round 1(Knights-The Cavalry of both sides clash at Romani.)
16 start and 8 move on:Map:Knights, 1-vs-1,5 games:Standard,Auto,Sequential,Escalating,Chained,Fog,30 Rounds.
Round 2(Australia-Troops from down under led the way.)
8 start and 8 move on:Map:Australia,1-8 player game,5 games: Terminator,Auto,Sequential,Escalating,Chained,Fog,30 Rounds.
Round 3(England-Yeomanry reserves take the field of battle.)
8 players start and 4 move on:Map:England,1-vs-1,7 games:Standard,Auto,Sequential,Escalating,Chained,Fog,30 Rounds.
Round 4(Oasis-Key water holes are fought over.)
4 players start and 2 move on:Map:Oasis,1-4 player game,5 games:Assassin,Auto,Sequential,Escalating,Chained,Fog,30 Rounds.
Round 5(WWII Ottaman Empire-Turks fight to keep land.)
2 start:Map:WWII Ottaman Empire,1-vs-1,7 games:Standard,Auto,Sequential,Escalating,Chained,Fog,30 Rounds.
Re: The Great War
The Spreadsheet
Some bragging
- So, long ago my tracking of these tournaments through the forum alone has outstripped my ability to keep track of them. Over the last few weeks (and with some help from LiveLoveTeach) I've been building the spreadsheet which can do so much more.
The spreadsheet:
https://docs.google.com/spreadsheets/d/ ... sp=sharing
Some bragging
- Okay, first a little bragging. Looking through the sheet, you find we have now had 431 iterations of 118 unique tournament templates! I'll say it again, because it quite blows my mind: 431 iterations of 118 unique tournament templates! Quite a body of work!
This is a good opportunity to honour the many people who have helped in this regard. Many thanks to everyone who has contributed with writing or coding tournaments!
This list includes (in chronological order):- bigWham
DoomYoshi
Gabriel13
JamesKer1
mcshanester29
waauw
takman2k
robellis00
xroads
ConfederateSS
morleyjoe
gigi_b
According to the spreadsheet, there have been 9688 players in these tournaments. That doesn't represent 9688 unique players; most people who play them play in more than one, and some have played in over a hundred. Sadly, I don't have any ready way to count unique players. Maybe one of the people who understands the API can figure something out for me. The 9688 represents the number of player spots in the various tournaments. Still, it represents a tremendous number of players participating by any standard.
On the down side, the spreadsheet also makes it obvious how much ground was lost during the 15 months from the spring of 2016 to the summer of 2017 when I was in my doldrums and writing very little.
- bigWham
- One of the things that becomes really obvious when looking at the list is how much the game loads have grown. (Game load is column 'F' in the spreadsheet.) In the first quarter of the War, the average tournament was 16 games (talking total games over the whole tournament, not "per round" game load. Also, it applies only to those who make the finals: with eliminations you may have fewer games than the max.) In the second quarter, the average tournament had 22 games. In the third quarter, it went up to 25. By the eleventh quarter, we had an average of 50 games per tournament, more than three times what we started with. (It has gone back down somewhat in the twelfth quarter.)
I think this is one of the dangers of the autotournament engine. With the autotourney engine doing the work of creating games and putting people into them, it's easy to fall into temptation and make really big tournaments. We tend to forget that people may be playing in ten or twenty of them at once, and while seven games per round may seem like no big deal in and of itself, it becomes a big deal when one is playing in twenty different tournaments that have seven games per round each.
Excessive game load wasn't much of an issue when I was writing very few new tournaments, but now that we're getting more help again and the number of tournaments is going up fast, I think we will need to really focus on making some really small tournaments to balance off the big ones.
Another thing we will work on, with slightly over a year left in the war, is making the tournaments shorter and shorter over the next year, so that most of them are done or close to done by the 100th anniversary of the Armstice, November 11th 2018. The spreadsheet helps with that task, also. There are two columns labelled "First Launch" and "Completion", and after that there is a "Days Elapsed" column. This allows us to look at tournaments, see which ones were slow, which ones were fast, and most importantly, the average days/round one can expect.
No matter what, not all will finish by then, but I think if the vast majority are done we can do something about the ones that remain. I have an idea forming, that when the Armstice comes, if very few tourneys remain, we can go through them and manually award Battle medals to the people who are in the lead at that time. Towards the goal of shortening tournaments in this final year, I'll soon be announcing some restrictions on upcoming tournaments in terms of settings and number of rounds.
- Okay, and finally for a discussion of medals.
I tried quite a while ago to come up with an objective quantification of how many Battle Medals a tourney should be worth. Of course, a perfect evaluation of difficulty level would be insanely complex, evaluating maps and settings and all kinds of things. That's beyond what's reasonably do-able. What I've done, using the spreadsheet, is to create a simple Difficulty Rating based on only three variables: the number of rounds in a tournament, the number of games, and the number of players. The formula is given as ROUND((SQRT(number of rounds)/3+SQRT(number of games)/7+SQRT(number of players)/7),1). It could probably be better described as a "Time and Effort Invested Rating" but "Difficulty Rating" will do, for simplicity.
The Difficulty Rating is Column 'I' in the spreadsheet. The number of Battle Medals each tournament awarded is given in Column 'K'. In between those two is an interesting little column labelled "Medal Imbalance". This is defined as the absolute value of the difference between the Difficulty Rating and the number of Battle Medals awarded. Since Difficulty Rating is a very loose approximation anyway, and since it's impossible to award fractional medals, we are not worried about any absolute difference which is less than one. There's a conditional formatting rule which highlights those tourneys where the absolute difference is more than one.
Looking through the highlighted tourneys, the vast majority are cases where the tourney probably paid out more medals than it really should have. This is not a problem. If some people raked in a little bonus, I'm not worried about it. The opposite situation, where the number of Battle Medals is significantly less than the Difficulty Rating, is gratifyingly rare. There are, in fact, only three tourneys where this is an issue:- Heligoland Bight, from Oct 2014
- Race to the Sea, from January of 2015, and
- Trentino, from June of this year
For the 2nd place winners in the 3 iterations of Heligoland Bight:
Donaldp03
macbone
Bullet Justice
For the 3rd place winners in the 4 iterations of Race to the Sea:
Awoodness
igotaished
stealth99
Osman76
Moving into the final year of the War, we will be adding a quarter point to the Difficulty Rating each quarter, and upping the medals where required.
13th Quarter: 0.25 added to each Difficulty Rating before rounding to Battle Medals.
14th Qtr: 0.50 added
15th Qtr: 0.75 added
16th Qtr: 1 added
This will result in a small rise in the number of medals, but not a grotesque jump like I tried to do in November of 2015.
-
robellis00

- Posts: 66
- Joined: Tue Aug 25, 2009 9:58 am
- Gender: Male
Re: The Great War
WOW! and WELL DONE!
I am definitely looking forward to more tournaments that are SHORTER.
What a massive effort overall, well done to all involved.
I am definitely looking forward to more tournaments that are SHORTER.
What a massive effort overall, well done to all involved.

Re: The Great War
Thank You, Thank You!
-
Sirius Kase

- Posts: 328
- Joined: Wed Feb 06, 2013 6:35 pm
Re: The Great War
Hi Dukasaur, I'm enjoying your Great War, been playing for quite a while now. This is not a complaint, I just want to know about tie breaker.
http://www.conquerclub.com/player.php?m ... nt_id=6108
I was eliminated today. There was a 6 way tie, 3 were eliminated, 3 moved on. What is the criteria for that decision?
http://www.conquerclub.com/player.php?m ... nt_id=6108
I was eliminated today. There was a 6 way tie, 3 were eliminated, 3 moved on. What is the criteria for that decision?
[img]https://s24.postimg.org/6rwmdezkl/signature-_IWWYL8_P7.png[/img]
Re: The Great War
Autotournaments have a 3-level tiebreaking system. It's described here: http://www.conquerclub.com/public.php?mode=tournaments5Sirius Kase wrote:Hi Dukasaur, I'm enjoying your Great War, been playing for quite a while now. This is not a complaint, I just want to know about tie breaker.
http://www.conquerclub.com/player.php?m ... nt_id=6108
I was eliminated today. There was a 6 way tie, 3 were eliminated, 3 moved on. What is the criteria for that decision?
So to simplify, score first, then overall win percentage, then how fast you won (lowest number of rounds), and last who signed up first.Ties in Score shall be broken by the following rules, applied in order:
- Percentage of wins in the tournament as a whole
- The cumulative number of Game rounds required to win the games they have won in the tournament (since the last point reset, or the start of the tournament if no point reset has occurred). Note: winning in less rounds is better.
- The order in which the player joined the tournament (first player to join wins)
“Life is a shipwreck, but we must not forget to sing in the lifeboats.”
― Voltaire
― Voltaire
-
Sirius Kase
- Posts: 328
- Joined: Wed Feb 06, 2013 6:35 pm
Re: The Great War
Thanks, that all makes sense. Now I need to go sign up for something else.
[img]https://s24.postimg.org/6rwmdezkl/signature-_IWWYL8_P7.png[/img]
Re: The Great War
.Sirius Kase wrote:Thanks, that all makes sense. Now I need to go sign up for something else.
Plenty more tourneys coming here...
“Life is a shipwreck, but we must not forget to sing in the lifeboats.”
― Voltaire
― Voltaire
-
ConfederateSS
- Posts: 4057
- Joined: Wed Dec 31, 2008 1:50 pm
- Location: THE CONFEDERATE STATES of AMERICA and THE OLD WEST!
Re: The Great War
------Since we are being modest,bragging....Chrono/speaking....I started on Mar.13,2017...and Joe started June 15/25,2017...Dukasaur wrote:.Sirius Kase wrote:Thanks, that all makes sense. Now I need to go sign up for something else.
Plenty more tourneys coming here...
------I use Terminator,to spare people of points...I use Assassin to try and make up for deadbeats,when more than 2 people are in the fight to keep things moving fair...
------I know we are shortening them...But I would like to Do Passchendaele,when I make my way to it after doing others in order...When I get to it...I would like to request right now to do an 11 rounder on,Passchendaele,for it was one of the most unique and DEADLIEST battles of World War I...Ironic as the city was named for Peace/Jesus...
------As I am having fun,as I research the battles for Wayward...Like finding KOOL unique things,like Col.Fawcett,and Cpt.Neville
-
ConfederateSS
- Posts: 4057
- Joined: Wed Dec 31, 2008 1:50 pm
- Location: THE CONFEDERATE STATES of AMERICA and THE OLD WEST!
Re: The Great War
------I love internet info...  ....As for the battle of Passchendaele...As I just skimmed through some sites... ...They have the casualty numbers at 5,6 or 800,000 combined for both sides...750,000 is the known fact...So I guess rounding to 800,000 who be o.k...The sites also leave out the landscape...For you see the battle of Pass. had a Town of Pass.,a Ridge of Pass. and a Fort of Pass....They seem to include all 3 as the Ridge/town,left the fort out altogether...What wasn't the case...As the battle was fought...It was hard to gain control of all 3 places at once...As they went back and forth...One side would take the city,while one side would take the fort or ridge...and so on,and so on throughout the battle...The internet left that point out as well,as what the town was named for...PEACE/JESUS... ...They would also stack dead bodies in a row over mud to walk on as a bridge over the mud...To get from one place to another...Maybe that fact was to horrible for the internet...
  ...We will cross that bridge of mud,when Wayward gets there ...
  ConfederateSS.out!(The Blue and Silver Rebellion)...
-
jytreberg
- Posts: 510
- Joined: Thu May 04, 2017 10:28 pm
- Gender: Male
- Location: Rochester, NY
- Contact:
Re: The Great War
This is fantastic, love the spreadsheet and all the work that has been done on this whole tournament. Thank you, thank you, thank you.