Page 1 of 1
Creating Ocean Rings Tutorial [GIMP]
Posted: Mon Jun 17, 2013 1:10 pm
by Seamus76
Below is my article from Issue 97 of the Dispatch, hope this can be of use.
Creating Ocean Rings by Seamus76 show
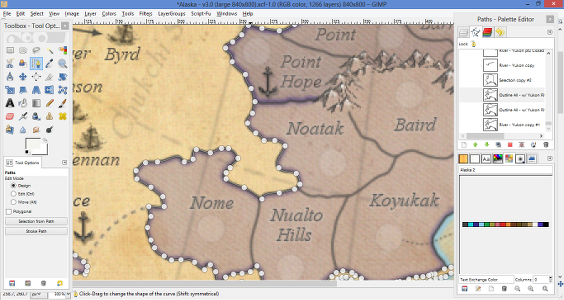
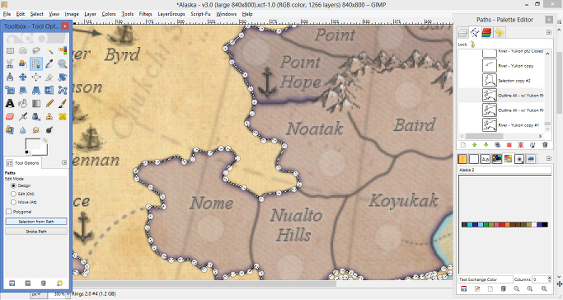
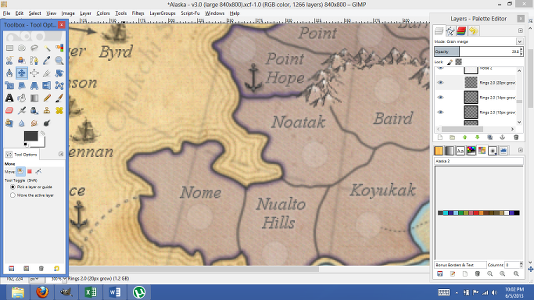
If you have ever been interested in making your own map, or just curious about how some things are done, today I'm going to show you how I did the ocean rings for my new Alaska map. Just like most things I'm sure there are a few ways to do this, using layer masks, and some other tools, so play around with the techniques and see what you can come up with. As per usual, I am using GIMP, but these techniques are probably the same in other programs as well. - The key to this is having a layer mask, or a selection of an area you can come back to and use in different ways. For me I like using Paths, which I had originally used (Path Tool) to create the outlines for all of my land, so it was easy to just activate(click on) that path and hit "Selection from Path". This will give you the little dots, or marching ants, around your land areas. As you can see from the two screenshots below, I have my Path around the area (1st image), and then the Selection after hitting "Selection from Path" (2nd image). - Next add a new transparent layer and name it "Rings". See *ProTip below to get creative. - Go to Select-Grow. Expand the selection about 2 pixel (or maybe 1 if you want really tight rings, but 1 is too tight for me). - Make sure you are on the "Rings" layer. Go to Select-Border, choose a 1px border. - Now, fill in the border selection, again always making sure the "Rings" layer is active when you fill it. For this map I used my favorite color 3f3f3f, but you can use black as well. Filling is easy, once you have your selection just drag the color from the pallet to the image and it should fill in the selection you made, in this case the "border selection". - Deselect the selection(Ctl+Shift+A). - Repeat these steps starting with the "Selection from Path" step, each time expanding the selection by about 5 pixels, then 8 pixels and so on. More or less, depending on the size of your image and how many rings you want. (For this map I expanded by 2px, 5px, 10px, 14px, 20px. But again it's up to you.) - After all of my rings were done, to finish off the antique look I'm going for, I added a 1 pixel Gaussian Blur (Filters/Blur/Gaussian Blur) to them all. - Finally set the layer mode to Grain Merge, and there you go. *ProTip: To get the rings to decrease as they moved out I created a new layer for each ring, somewhat a pain in the butt, prior to filling the border with color. This allowed me to then change the opacity level of each separate ring so that as they move away from land they become lighter. I left them on separate layers, rather than merging them so I could go back to each one individually if need be. On Alaska I have 5 rings, decreasing from 100%, 100%, 75%, 50%, 30% respectively. Give this a shot on your next project, or your current #GCCM map (details of which can be found here ), and as always if you have any questions just let me know.
Re: Creating Ocean Rings Tutorial [GIMP]
Posted: Thu Jun 20, 2013 11:39 am
by ManBungalow
A very good tutorial.
Lines such as these are good for setting the perspective. Tighter lines suggest a more 'zoomed out' picture of the area.
I did something similar with the coastline of Mystical Era (see spoiler below).
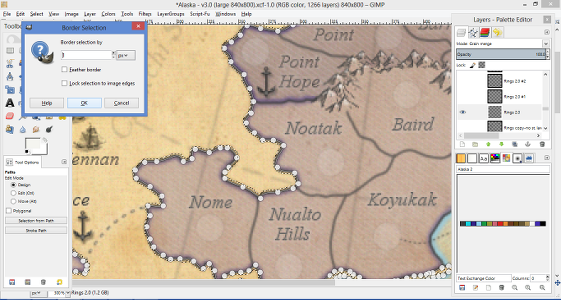
Only differences really are that I didn't use the border function (I've never actually tried it before)...just grow selection, fill, shrink, delete. Your way seems more simple. Also, I used the feather tool instead of gaussian blur. I don't like the blur operations much.
You can see that I went one step more extreme and added a different colour under the lines here, just to really soften the gradient:
show
Granted, the lines I made are of super-low opacity, but that's just what I do.